Showing posts with label Coworkers. Show all posts

Tuesday, June 28, 2016

Things I'm Lovin' Tuesday: Desert Nova The Hip Bag

This is a non-sponsored review and all opinions are 100% my own.

A few months ago I started another monthly blog series called
THINGS I'M LOVIN' TUESDAY!!!
Past post can be found:
here, here, here, here, here, here, here, here, here AND here.
And make sure to check back every last Tuesday of the month!

Now onto what I'm lovin' this month...


One of my dear friends recently came out with a great bag!
When she first told me about it I was a little skeptical about the idea,
but after seeing it in person and feeling the quality,
I knew it was something great and I wanted one ASAP!


To start off - these bags are really cute!!!
The details are high quality and simply amazing.


While I'm not a music festival goer like my friend,
I knew I could make use of it in many different situations myself.
There are many times it's easier to not carry a bag and have a free hand.
And it's even better if you still look really cute!

I could have used it last year at Tacolandia!
I could use it while horseback riding even!!
How would YOU wear your bag???


Saturday, May 21, 2016

Banana Bread Bunts

I've made banana bread and blogged about it many times before.
You can read about it here, here and yup here too!
But in all the times I've made banana bread,
I had yet to make it into a banana bread bunt!

When I found mini bunt pans earlier this year,
I knew I had to make not only the mini bunts,
but a full sized banana bread bunt too of course!

The Goods:
Butter
Sugar
Eggs
Sour Cream
Flour
Baking Powder
Baking Soda
Salt
Mashed Banana 
Lemon Juice
Chocolate Chips

In a large bowl, combine the flour, baking powder, baking soda and salt.

In another large bowl, cream the butter and sugar together.

Add the eggs and sour cream, mixing until combined.

Add the dry ingredients to the wet ingredients and mix again.

Now mix in the mashed bananas and lemon juice.

Finally, add a bag of chocolate chips and mix one last time!

Spray your bunt pan(s) with baking spray and preheat your oven to 375 degrees.

Fill your mini bunt pans about 3/4 of the way full...

And then fill your regular sized bunt pan with the rest of the dough.

Bake the mini bunts for about 30 minutes - until a toothpick comes out clean!

Cool for about 5 minutes, remove from pans and finish cooling on a wire rack.

The regular sided bunt will take a little longer to bake.
Mine was in right about an hour and turned out perfectly!

As with the mini bunts, cool in the pan for about 5 to 10 minutes,
then remove from pan and finish cooling on a wire rack.


Banana Bread Bunts
(Makes 1 Large and 4 Mini)

6 Tablespoons Butter
2 Cup Sugar
2 Eggs - beaten
1 Cup Sour Cream
4 Cups Flour
4 Teaspoons Baking Powder
2 Teaspoon Baking Soda
1 Teaspoon Salt
1 1/2 Cups Mashed Banana
2 Tablespoons Lemon Juice
2 Cups Chocolate Chips
  1. In a large bowl, combine the flour, baking powder, baking soda and salt.
  2. In another large bowl, cream the butter and sugar together.
  3. Add the eggs and sour cream, mixing until combined.
  4. Add the dry ingredients to the wet ingredients and mix again.
  5. Now mix in the mashed bananas and lemon juice.
  6. Finally, add a bag of chocolate chips and mix one last time!
  7. Spray your bunt pan(s) with baking spray and preheat your oven to 375 degrees.
  8. Fill your mini bunt pans about 3/4 of the way full and then fill your regular sized bunt pan with the rest of the dough.
  9. Bake the mini bunts for about 30 minutes - until a toothpick comes out clean!
  10. Cool for about 5 minutes, remove from pans and finish cooling on a wire rack.
  11. Bake the regular sided bunt a little longer - mine took about an hour and turned out perfectly!
  12. As with the mini bunts, cool regular sized bunt in the pan for about 5 to 10 minutes, then remove from pan and finish cooling on a wire rack.
This post contains affiliate links meaning I may get a paid for certain purchases.

Monday, March 7, 2016

Baked Donut Monday: Peanut Butter and Chocolate!

Monday, Monday Monday!!!
I'm back again for another Baked Donut Monday post
and today I'm going to tell you about some super tasty
PEANUT BUTTER AND CHOCOLATE DONUTS!

The more baked donuts that I make, the harder it is to come up with new ideas.
So when I realized a co-worker's family member makes baked donuts,
I was quite happy and had the hardest time picking which to adapt.
In the end, Peanut Butter and Chocolate won out because YUM!!!

I wasn't going to change much to Jonathan's recipe,
but I don't do many things the easy way in life,
so of course I had to change a thing or two.
And the biggest change was making them dairy free!

Keep reading to see how these yummy donuts are made.

The Goods:
All-Purpose Flour
Baking Powder
Baking Soda
Salt
Brown Sugar
Unsalted Butter
Creamy Peanut Butter
Egg
Vanilla Extract
Almond Milk
Vinegar
Powdered Sugar
Unsweetened Cocoa Powder
Peanut Butter Chips

Make your homemade almond buttermilk and set aside.
(Simply replace almond milk for regular milk!)

Whisk together the flour, baking powder baking soda and salt.
Set aside.

Mix the butter, peanut butter and brown sugar until light and creamy.

Add the egg and mix completely.

Next add the vanilla and stir until combined.

Now time to add the dry ingredients and almond buttermilk alternately.

Mix in half the dry ingredients...

Now mix in all of the almond buttermilk...

And finally mix the remaining dry ingredients until incorporated. 

Transfer donut batter to a large zipper bag.

Cut off the end of the zipper bag 
and fill your donut pan until 1/2 to 3/4 full.
If you have empty spaces, fill with water to prevent pan from burning!

Bake at 350 degrees in greased donut pan for about 10 minutes.
Depending on your oven, these may take less or more time.
Test with a toothpick - if it comes our clean the donuts are done!

Cool in the pan for a minute or two, 
then transfer to a wire rack to finish cooling.

While donuts are cooling, it's time to make your chocolate glaze!

Whisk together the powdered sugar and unsweetened cocoa powder.

Add 3 tablespoons almond milk and mix to make glaze.
If glaze is too thick, add another tablespoon of almond milk to thin.

These may look like chopped up peanuts,
but really they're chopped up peanut butter chips!!!

Take a cooled peanut butter donut...

And dip the smooth size into the glaze.

So that it's almost half covered and looks something like this!

Immediately after, dip glazed donut into the chopped peanut butter chips.

Space the donuts out on a wire rack in order for glaze to set. 

You can do both the chocolate glaze and peanut butter chips for all the donuts,
or you can be like me and leave some just chocolate glazed.
While both were tasty, I think I liked the simple chocolate best!

Lastly, package up a few of the tasty treats to give away!

Peanut Butter and Chocolate Donuts
Adapted from The Candid Appetite

For the Donuts:
1 Cup All-Purpose Flour
3/4 Teaspoon Baking Powder
1/4 Teaspoon Baking Soda
1/2 Teaspoon Salt
1/3 Cup Brown Sugar
3 Tablespoons Unsalted Butter
1/4 Cup Creamy Peanut Butter
1 Egg
1 Teaspoon Vanilla Extract
1/2 Cup Almond Buttermilk

For the Glaze/Toppings:
1 Cup Powdered Sugar
3 Tablespoons Unsweetened Cocoa Powder
3 to 4 Tablespoons Almond Milk
1 Teaspoon Vanilla Extract
1 Cup Chopped Peanut Butter Chips

  1. Make your homemade almond buttermilk and set aside. Simply replace almond milk for regular milk!
  2. Whisk together the flour, baking powder baking soda and salt. Set aside.
  3. Mix the butter, peanut butter and brown sugar until light and creamy.
  4. Add the egg and mix completely.
  5. Next add the vanilla and stir until combined.
  6. Now time to add the dry ingredients and almond buttermilk alternately. Mix in half the dry ingredients, followed by all of the almond butter milk, and finish with the rest of the dry ingredients.
  7. Transfer donut batter to a large zipper bag.
  8. Cut off the end of the zipper bag and fill your donut pan until 1/2 to 3/4 full.
  9. Bake at 350 degrees in greased donut pan for about 10 minutes. Depending on your oven, these may take less or more time. Test with a toothpick - if it comes our clean the donuts are done!
  10. Cool in the pan for a minute or two, then transfer to a wire rack to finish cooling.
  11. While donuts are cooling, it's time to make your chocolate glaze! Whisk together the powdered sugar and unsweetened cocoa powder. Add 3 tablespoons almond milk and mix to make glaze. If glaze is too thick, add another tablespoon of almond milk to thin.
  12. Take a cooled peanut butter donut, dip the smooth side into the chocolate glaze and then immediately into the chopped peanut butter chips.
  13. Space the donuts out on a wire rack in order for glaze to set. Once set, dig in and ENJOY!!!

Wednesday, January 20, 2016

Bubble Bath Review: Beauty Counter Kid's Counter Body Wash

This is a non-sponsored review and I was given the Bubble Bath.

Happy Wednesday guys!!!
It's the First Bubble Bath Review of 2016!
I know I'm excited and hope you are too.

Towards the end of last year I was talking to a coworker about Beauty Counter
she's a big fan of their product and I couldn't wait to try them out.
While they don't have a bubble bath, the kid's body wash doubles as one!

I decided, what the heck I'll give it a shot!
My awesome coworker loaned me a bottle to try as well.
 

 Great reading material and an adult beverage of course!


 I started with 10 pumps...then added another 10...
then added another 10 when it was all said and done!
I wanted lots and lots of bubbbbbbbbbles!!!


 I guess I shouldn't have expected TONS from a body wash though.


Just enough bubbles to get sucked into the book!

While I didn't have high hopes for this,
I was presently surprised to be honest!
It's a body wash that doubles as a bubble bath pretty well.
The bubble were there, but they didn't last too long sadly.

So overall, I wouldn't recommend this an an adult bubble bath,
but it'd be great for children! And better than others I've tried even! HA!!

If you missed them, make sure to check out past bubble bath reviews:

Wednesday, August 12, 2015

DIY: Sandie's Quilted Tote Bag

One of my coworkers recently made herself a Quilted Tote Bag.
I liked it when I saw it, but liked it even more after talking to her about it.
Lucky me - she offered to make me my very own!
And just a few short days later, she was handing it to me.

I was very excited about my new tote bag,
and even showed it off to a few other coworkers!
Driving home that night I had a light bulb go off in my head:
ASK SANDIE TO DO A DIY GUEST POST ABOUT THE BAG!!!

Lucky me again - not only was she super awesome and agreed,
but she already had a bunch step by step pictures taken!
So enough outta me - I'll let Sandie take over,
so she can tell you all about the Quilted Tote Bag she made!

Hi I'm Sandie and I've worked with Robyn for years now.
We're always talking about fun little projects we're making
and now I get to share a recent one with you!
Want to see other DIY project I've made? Then head here!

Since the first bag I made was an experiment of sorts, I didn't take photos. 
But, after completing it and finding it smaller than I expected, I decided I wanted to rework it. 
Fortunately, Robyn said she loved it, so that gave me reason to make this amended version. 
Let's get started...


THE GOODS:
(18) 5" x 5" squares (I used a charm pack, but you can cut your own, if preferred)
(1) 8" x 15" piece of fabric for the bottom
(1) 18" x 25" fabric for the lining (this is approximate, you'll need to trim to fit)
(2) 4" x 15 piece of fabric for the handles
(1) 1 1/2 x 5" piece of fabric for the button loop
(1) 17" x 27 piece of batting  - it should be a couple of inches bigger than the outside of your bag. 
(1) Button

BEFORE YOU START SEWING, CUT ALL OF YOUR PIECES,  

SO YOU CAN MOVE THROUGH EACH STEP EASILY. 

FRONT: 
Select 18 squares and organize them into your preferred design.  
You'll use 8 for each side of the bag (4 per row). Once you have the design laid out, start sewing each row together with right sides together and 1/4" seams. You should now have 4 rows. Press your seams with iron, then with right sides together sew 2 rows together, lengthwise. Press your seams and you'll now have 2 panels. 


Attach the bottom, with right sides together sew each panel to each length of of the bottom fabric, and then press your seams. Now let's add the batting. Lay out your batting, then lay your whole front side on it (right side up). Spray baste or pin, smoothing out as you go to eliminate wrinkles.


Now you are ready to quilt. If you are an experienced quilter, quilt away, but if not, you can use the simple method of straight lines, which is what I did. I made one line down the middle and then continued lines at about 3/4" apart (you could also use a zig zag stitch to give your lines some character). Once you have finished quilting trim the edges of your batting. 


Let's make this look more like a bag. Fold the quilted top in half, right sides together and sew side seams (1/4") so that the seams between the bottom piece  and the charms line up. (Pin if needed)

Next we are going to create the bottom of the bag. Pull the sides apart until the sides form a triangle and the seam is centered. Measure 1-1/2" from the corner, draw or pin and then sew straight across. Trim each corner to 1/4" seam. This will make the bottom approximately 3" across. The deeper your triangle, the wider your bottom will be, so make it your own.  

LEAVE YOUR BAG TURNED INSIDE OUT.


We're about half way there, so hang in there! 

LINING:

Fold the lining fabric in half, right sides together and then sew 1/4" seams along each side. Leave a   4" opening on one of the sides so you can turn the bag. Then form the corners the say way you did the front piece.  TURN YOUR LINING RIGHT SIDE OUT.


HANDLE & BUTTON CLOSURE:
Press the handle strips in half lengthwise, right side out. Open, and press the outer edges towards the middle. Fold closed and press. Stitch down the length of the handle about 3 or 4 times. 


NOW IT'S TIME TO ASSEMBLE!!! 
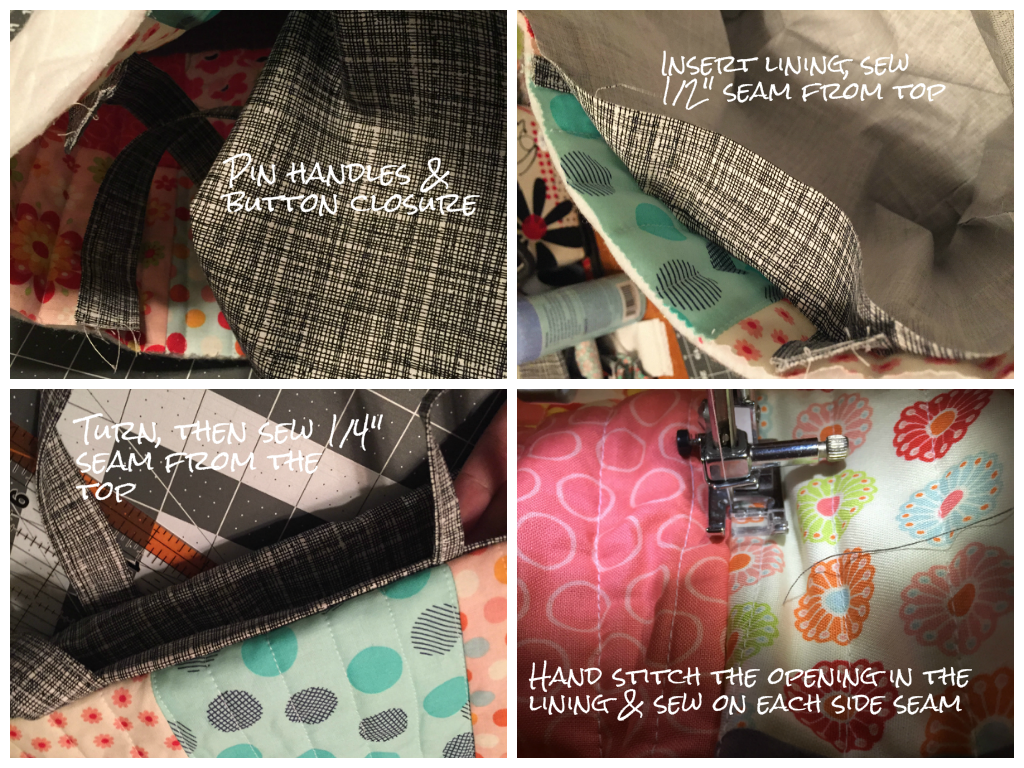
Pin your handles into the quilted piece of the bag. The wider you set your handles the shorter they will be, so make sure you line them up. The handles should sit inside the bag, so that once the bag is turned, they are on the outside. Now do the same with the button closure, making sure to center it.  

 Next you are going to insert the lining into the quilted bag. Since your lining is right side out when you drop it in, the pieces will be right sides together. Pin the lining to the top then stitch around the top about 1/2" down from the top. 


Using the opening in the lining, 
pull your bag through and turn the whole bag right side out. 
YOU'RE ALMOST THERE... 
Tuck the lining down into the bag and then topstitch a 1/4" from the top. 
Now line up your button with the closure and sew it on. 


Technically your bag is now done! HURRAH!! 
But, I added a few finishing touches...

 #1 - After you turn your bag, hand stitch the opening closed. 

This will keep things from sneaking through to the middle of your bag. 

#2 - I added a side stitches to keep the lining from moving around. 
On the outside from the top, I stitched inside of the existing seam 
("stitch in the ditch", is the quilters lingo). 


AND THAT IS THAT!!
 Having learned the process from the first bag, I was able to get this second one done in an evening. 
The final size of the second bag was 9 1/2" x 17". 

Thanks for your time, I hope you find this project as much fun as I did.