Sunday, December 30, 2012

Holiday Cards

I know I don't normally post much about the "More" part of my blog, but I thought NOW would be the perfect time! 

I think I've mentioned it before, but I pretty much make ALL of my cards. I honestly cannot remember the last time I paid for one. That's not to say mine are cheaper, it's just something I enjoy doing.

Even thought it's something I like to do, and I THINK people like to recieve them, I was a little stressed about getting everything done this holiday season. Making homemade cards were the last thing on my list sadly...

Less than a week before Christmas I had a list of 10 cards I needed to make and hadn't started on ANY! I figured I'd pick the most important ones and make those, and move onto more if I had time.

Well...one night I got super motivated, sat down in front of the tv and went to town making those cards! I got eight out of the ten made that night and I was very happy with the work I'd done too.  I finished the next two the following day.

Now that I've gone on and on and probably bored you...here's a look at the finished products!


Christmas Goodies

I know it's been FOREVER since I posted, but I've been a little busy with the holidays and all. I'm sorry! To make up for it, this is the first of many blogs I will be posting in the near future! 

Now let's get onto the goodies!!

For the past few years, I've gone crazy making goodies to give away (and eat too...) for the holidays. Proof can be found here and here! :)

I didn't really have much planned for this year, but I woke up one Saturday and decided I was going to make a thing or two. Quickly, the thing or two turned into eight, yes EIGHT hours of baking!!! I was very tired, but super happy with the outcome.

Most of the goodies are things I've made before, but I ventured into something new too and am glad I did! Now take a look at all the goodies I made.

The Goods for EVERYTHING!!!
Sorry, I'm not listing it all...

First up I made the Red Velvet Cake for the Cake Truffles.
(Note: Cake Truffles are previously known as Cake Balls...)

Mixing the cake.

Cake ready to be baked.

Now crumbling it up after baking!

There should have been a picture mixing the frosting in, 
but I fail! :( I'm sorry!

The rolled out truffles before the candy coating.

Next up, was the fudge!
I made one batch and did half with nuts and half without.

Butter, Chocolate Chips and Vanilla

+

Melted Marshmallows and Water

+

Sugar and Evaporated Milk

=

AMAZINGNESS!

I'm sorry ... 
I fail again. I don't have a finished picture of either fudge! :(

I missed the fudge picture because 
I was SO excited to make Spritz cookies!!!

They are so good, but I never think to make them 
any other time of the year. I should though!

After the Spritz cookies I moved onto Chocolate Chip.


They will always be a favorite or mine. 
And others seem to enjoy them as well!

Last, and certainly not least was something I'd never made.
 I ventured into...

Gingerbread Cookies!!
(A much more detailed post about this is coming SOON!)

I may make one more batch of something before going back to work in the next few days. If so - look for a post on those in the near future as well.

I hope you all got to enjoy some holiday goodies this year!  

Happy Holidays!
xoxo

Sunday, December 9, 2012

Homemade Pasta With Friends

One of my neighbors has been making homemade pasta for awhile now. I recently had the pleasure of being able to join in the fun!! It was SO simple to make and the taste was simply amazing. I cannot wait to get my own pasta maker, so I can make some whenever I want! 

Take a look at all the fun we had making pasta from scratch!

The Goods - Part One:
Flour
Eggs

The Goods - Part One AND Part Two:
Flour and Eggs (As Pictured Above)
Parmesan Block
Garlic
Lemon
Basil
Red Pepper Flakes
Olive Oil
Cooked Shrimp

Put flour in a BIG bowl and make a well in the center.

Add the eggs.

And mix with a fork.

Until it looks similar to this.

Sprinkle some flour on a flat surface.

And spread it out with the palm of your hand.

The dump the misture from the bowl on the flour.

Now finish mixing it up so the flour is fully incorporated. 

Keep kneading!

 
Your dough should look something like this!

Cover the dough with plastic wrap and set aside for about 15 minutes.

During that time, get the rest of your ingredients prepared!

And set up your pasta maker.

Grab some of the pasta and begin to roll it out.

Each piece will have to be rolled through multiple times.
It has to get really thin!

Keep rolling it out!

More of the rolling out process.

And even more!

Almost thin enough.

One last time!!!

And done!

Now set it aside and roll out the REST of the dough!

Once it's all rolled out, start the cutting process.

Fettucini!

Fresh pasta cooks really fast, 
so keep it aside until everything else is basically ready. 

Make sure your water is BOILING. 
Cook the pasta for a couple minutes, I'd say 5 minutes max!

Drain and then toss with all the other goodies!

Keep tossing until everything is combined.

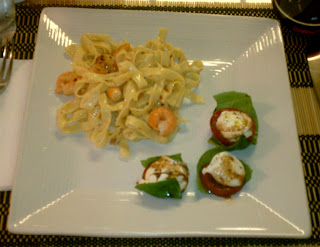
Dig in and enjoy with a side Caprese Salad!

Homemade Pumpkin Ice Cream

I love pretty much anything made with pumpkin. It's SO good and I cannot get enough of it this time of year. I hadn't made ice cream in awhile, but last week I decided I wanted to try to make some Pumpkin Ice Cream with some of my Homemade Pumpkin Puree!

After a little searching online for a recipe without eggs, I decided to just kind of make my own and hope for the best! I've made many different kinds of ice cream before, so I wasn't too worried. Turns out...I had NOTHING to worry about! The Pumpkin Ice Cream turned out great and everyone who's tried it has loved it!

Take a look at how I made this amazing treat and then go make some for yourself! You could even add a little whipped cream for more of a pumpkin pie taste!!

The Goods:
Cream
Skim Milk
Brown Sugar
Ground Ginger
Ground Cinnamon
Ground Cloves
Vanilla Extract
Salt


Combine Cream, Milk, Puree and Brown Sugar. 
Stir until combined and sugar is disolved. 

Add the remaining ingredients.

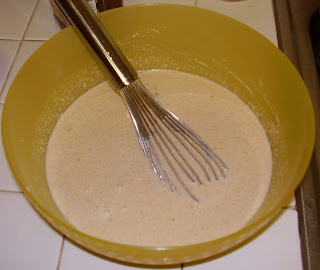
And stir/whisk until mixture is combined.

Pour mixture into an ice cream maker and churn until creamy. 

After being frozen awhile! 

Robyn's Pumpkin Ice Cream Recipe:
1 Cup Cream
1 Cup Skim Milk
1 1/2 Cups Pumpkin Puree
1 Cup Packed Brown Sugar
1/2 Teaspoon Ground Ginger
1 Teaspoon Ground Cinnamon
1 Teaspoon Vanilla Extract
1/4 Teaspoon Salt
1/8 Teaspoon Ground Cloves

1. In a large bowl, combine Cream, Milk, Puree and Brown Sugar. Stir until combined and sugar is disolved. 

2. Add the remaining ingredients and stir/whisk until mixture is combined.

3. Pour mixture into an ice cream maker and churn until creamy. It will be more of a soft serve like texture right out of the ice cream maker. Freeze it for a few hours before serving for best results.