Showing posts with label Grilled. Show all posts

Sunday, September 25, 2016

Lemongrass Chicken Banh Mi

I consider myself a pretty big foodie and  I love trying new foods!
I am pretty picky so I don't always love everything that I try,
but when one of my best friend introduced me to Bahn Mi sandwiches,
I immediately knew I wanted to recreated it in my own kitchen!

I did what I do quite often and turned to Google in search of a recipe.
I found quite a few ideas, but decided to use this one,
and modify it slightly to make the sandwiches to my liking.
Keep reading to see how I made them!

The Goods:
Serrano Chilis
Jalapenos
Fresh Lemongrass
Green Onions
Coconut Sugar
Tamari
Rice Vinegar
Carrots
English Cucumber
Radishes
Tomatoes*
Spinach*
Limes
Fresh Ginger
Garlic
Chicken Thighs
French Rolls

*Include in your shopping list if wanting to make salad instead of sandwichs

In a blender, add the following:
2 Serrano chilies - thinly sliced
1 lemongrass stalk -smashed and cut into 1/2 inch pieces
2 green onions - thinly sliced
1 teaspoon coconut sugar
6 tablespoons tamari
1 lime - zested
10 inch piece of ginger - peeled and chopped
2 garlic cloves - peeled and smashed

Puree for about a minute until paste like consistency.

Pour half of the mixture into a large lidded container.

Add your chicken thighs...

And cover with the remaining half of the mixture.

Cover and let marinade for at least 30 minutes,
but can be marinaded for up to 24 hours!

While meat is marinating, make your quick pickled vegetables.

In a medium mixing bowl, whisk together the following:
2 Teaspoons Coconut Sugar, juice from one lime and 3 Teaspoons Rice Vinegar.
Add 2 grated carrots, 1 thinly sliced Serrano chili and 1/3 of an English cucumber.
Mix well and let sit at least 10 minutes, or refrigerate overnight. 

Heat your grill to medium high, wipe off excess marinade and place chicken on hot grill.

Grill each side about 5 to 7 minutes.

Let grilled chicken rest a few minutes...

And then chop it all up into bite sized pieces!

Make sure to grill your french rolls so they're nice and toasty,
and then assemble the sandwich to your liking.

Mmm mmm mmmm!

Looking at this picture, I can just taste the deliciousness of the sandwich!

Lemongrass Chicken Banh Mi Sandwich
Adapted from Goop

3 Serrano Chilis
1 Jalapenos**
1 Stalk Fresh Lemongrass
2 Green Onions
2 Teaspoons Coconut Sugar
6 Tablespoons Tamari
3 Teaspoons Rice Vinegar
2 Carrots Carrots
1/3 English Cucumber
2 Radishes**
3 Limes
10 inch Piece Fresh Ginger
2 Cloves Garlic
1 1/2 Pounds Chicken Thighs
French Rolls

**Used for Sandwich Garnish

  1. In a blender, add 2 Serrano chilies - thinly sliced, 1 lemongrass stalk -smashed and cut into 1/2 inch pieces, 2 green onions - thinly sliced, 1 teaspoon coconut sugar, 6 tablespoons tamari, 1 lime - zested, 10 inch piece of ginger - peeled and chopped and 2 garlic cloves - peeled and smashed. Puree for about a minute until paste like consistency.
  2. Pour half of the mixture into a large lidded container, add the chicken thigh and cover with the remaining half of the mixture. Cover and let marinade for at least 30 minutes, but can be marinaded for up to 24 hours.
  3. While meat is marinating, make your quick pickled vegetables. In a medium mixing bowl, whisk together the following: 2 Teaspoons Coconut Sugar, juice from one lime and 3 Teaspoons Rice Vinegar. Add 2 grated carrots, 1 thinly sliced Serrano chili and 1/3 of an English cucumber. Mix well and let sit at least 10 minutes, or refrigerate overnight. 
  4. Heat your grill to medium high, wipe off excess marinade and place chicken on hot grill. Grill each side about 5 to 7 minutes.
  5. Let grilled chicken rest a few minutes,then chop it all up into bite sized pieces.
  6. Grill the French rolls so they're nice and toasty,and then assemble the sandwich to your liking.

Friday, September 16, 2016

Grilled S'mores!

Summer will be gone in less than a week.
And while I'm REALLY excited for Fall,
(Hello boots, scarves and sweaters!!!),
I'm going to miss a few things about Summer.

And one of those things is s'mores!

Of course you can make s'mores year-round,
but there's just something about the hot Summer months
that just make it perfect for s'more making!!!
I even started my Summer making them Memorial Day weekend at the beach.

Now if you're like me and crave s'more year round,
I have a super easy solution for you!
Having a nice bonfire to roast your marshmallow is nice,
but it's not a necessity for s'more making.

I bought a grill this Summer and was grilling everything possible.
I quickly realized I didn't need a bonfire to make s'more,
and could use my newly purchased grill instead.
You don't get the same effect as sitting around a fire, but they're just as tasty!!!

The Goods:
Large Marshmallows*
Chocolate Bars
Graham Crackers

*I purchased S'mores specific marshmallows with HIGH hopes,
but sadly they didn't roast as easily as regular large marshmallows.
The weight distribution seemed off or something.

Get all your ingredients prepped before starting to roast your marshmallows.

My grill has easily removable plates,
so I took them off to get closer to the flame.

Roast the marshmallows on a stick like usual.

Once your marshmallow is golden brown and gooey,
 sandwich between two graham crackers and some chocolate.

Take a bite of the deliciousness,
 getting marshmallow all over your face,
and enjoy this yummy treat!


Sunday, June 26, 2016

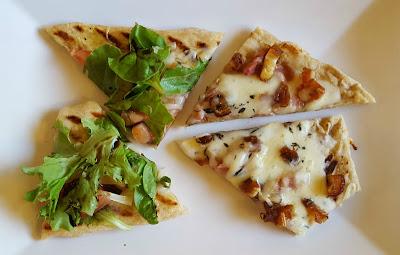
Grilled Pizzas!

One of my best friends introduced me to grilled pizza a few years ago.
I was hooked from the first bite and even shared about them in 2012!
I promised I'd share about them soon and I guess I failed on that.
Or that soon is apparently almost four years later...whoops!

These pizzas are well worth the wait though.
They are a step up from your regular pizza with a smokey grilled flavor.
And while basic pizza toppings like pepperoni are always good,
unique flavors like these below are by far my favorite!

The Goods:
Pizza Dough
Dates
Prosciutto
Thyme
Mozzarella Cheese
Tomatoes*
Baby Greens or Arugula*
(*Not Pictured)

Cut dough in half, stretch out and then grill both sides on cast iron grill pan.

Add your topping to each pizza dough.
I did date, prosciutto and thyme on one
and fresh diced tomatoes and prosciutto on the other.

Grill with top covered for 5 to 10 minutes, 
until bottom is crisp and cheese is melted.

I added a bunch of baby greens and more fresh tomatoes to the one without dates.

Fresh tomato, prosciutto and baby greens.

Date, prosciutto and thyme.

Yummmmmmmmmmmmmy!

Now go make yourself some grilled pizza.
You and your stomach will be very happy!

Date and Prosciutto Grilled Pizzas
1 Package Premade Pizza Dough
5 to 6 Dates, Chopped
4 Slices Prosciutto, Chopped
4 to 5 Sprigs Thyme, Leaves removed from stems
1 to 1 1/2 Cups Shredded Mozzarella Cheese

  1. Cut dough in half, stretch out and then grill both sides on cast iron grill pan.
  2. Add your topping to each pizza dough.
  3. Grill with top covered for 5 to 10 minutes, until bottom is crisp and cheese is melted.
  4. Cut and devour immediately! 

This post contains affiliate links meaning I may get a paid for certain purchases.

Sunday, August 30, 2015

Pulled Pork Quesadillas

Back in March, I ran across this recipe.
A Pulled Pork Quesadilla?
And with pickles inside?!?

I'd never heard of such a thing, 
or even thought about it,
but man it sounded good!!!

I was quite intrigued,
so I made a mental note to give it a try,
and not too long after I did just so!

Wow you guys - it was really good!
So good that I thought about it many times the next day,
and even made it for dinner for a second night in a row!!!

Not only are they really tasty,
but they're super easy to make too.
Let me show you how!!!

First things first - make your pulled pork.
I've used many different recipes over the years,
but this time I followed this recipe and loved it!

Cook your pork in the crock pot,
and then shred it using two forks.

Add your favorite BBQ sauce...

And mix it up with the pulled pork.

Now that the pork is done, it's time for quesadillas!!!!

The Goods:
Flour Tortillas
Cheddar Cheese
Pickles
Red Onion
BBQ Sauce

Get all your goods prepped:
Shred your cheese.
Dice your onion.
Chop your pickles.

Now the fun part - assembling the quesadilla!

I started with one tortilla
and a nice layer of cheese.
Then I added pulled pork,
threw on diced red onion, 
then lots of chopped pickles
and finally another layer of cheese!!!

Heat your grill pan over medium-high heat
and then spray it with oil cooking spray.

Carefully place your assembled quesadilla on the grill pan,
then top it with a second tortilla to complete your quesadilla.

Keep an eye on the quesadilla while it's cooking
and once it has nice grill marks, flip that baby over!

Continue cooking until the cheese is melted
and both sides have a nice color from the grill pan.

Let rest a minute and then slice for serving.

Now dig in and enjoy your yummy quesadilla!!!

I personally have only tried the pulled pork version,
but this could also be modified to use whatever meat you like.
My mouth is watering just thinking of the possibilities!

Pulled Pork Quesadillas
1 Pack Flour Tortillas
Cheddar Cheese, shredded
1 Red Onion, diced
Pickles, chopped
BBQ Sauce

  1. Make your Pulled Pork.
  2. Shred your cheese, dice your red onion and chop your pickles.
  3. Assemble your quesadilla as follows: tortilla, cheese, pulled pork, onion, pickles, more cheese and finally a second tortilla.
  4. Carefully place assembled quesadilla on preheated and sprayed grill pan.
  5. Once cheese begins to melt and bottom tortilla has grill marks, flip the entire quesadilla over.
  6. Continue to cook until cheese is melted and both sides have a nice color from the grill.
  7. Remove from grill, let sit a minute or two and then slice to serve.

Sunday, July 26, 2015

Dad's Lemon Pepper Chicken

My dad has made Lemon Pepper Chicken for years.
I can't remember a birthday growing up,
that I didn't request for him to make it for dinner!

After I moved away and started to cook more variety,
I asked him for the recipe and only slightly modified it!
Keep reading to see how this tasty chicken is made.

The Goods:
Chicken
Lemon Juice
Olive Oil
Worcestershire Sauce
Fresh Pepper
Garlic
Garlic Salt
Salt
Fresh Thyme

Squeeze your lemons to get fresh lemon juice.

I recently got a lemon squeezer and don't know how I lived without.
It makes getting fresh lemon, lime or even orange juice so easy! 

It took me three lemons to get 1/2 cup of juice.

Add everything except the chicken to the juice.
And then mix until everything is incorporated.

You can use whatever chicken you'd like.
Boneless, bone in - it really doesn't matter.
I've had it on all, but I prefer boneless breasts.

Add a little bit of marinade to a container with a lid,
add your chicken and then the rest of the marinade.
Secure lid tightly and marinate a few hours or overnight.


Grill your chicken until cooked fully.

Then serve with a yummy side or two and enjoy!!!

And if possible - dine outside with a yummy cocktail!


Dad's Lemon Pepper Chicken 

About 1 Pound Chicken
1/2 Cup Fresh Lemon Juice
2 Tablespoons Olive Oil
1 Teaspoon Worcestershire Sauce
2 Cloves Garlic - minced
1/2 Teaspoon Fresh Ground Pepper
1/2 Teaspoon Garlic Salt
1/4 Teaspoon Salt
1 Teaspoon Fresh Thyme

  1. Juice lemons until you have 1/2 a cup of juice.
  2. Add everything else, except the chicken, and combine well.
  3. Put marinade and chicken in a container with a lid.
  4. Refrigerate for at least a few hours, or overnight.
  5. Grill until chicken is cooked fully.
  6. Serve and enjoy!!

Sunday, May 24, 2015

Turkey and Pesto Panini

I recently made a batch of pesto for some pasta I was making.
I had some leftover and didn't want to make more pasta,
so after a little brainstorming I decided to make:
Turkey and Pesto Paninis!!!

I'd never actually made a panini before,
but thought what the heck and gave it a shot!
It was SO easy to make and incredibly tasty.
In fact, I made it again just two nights later!

Keep reading to find out how easy it really is to make.

The Goods:
Sourdough Bread
Pesto
Butter
Mozzarella
Deli Turkey
Arugula
Balsamic Vinegar 
(Not pictured - oops!)

Butter one side of the bread and then cover the other side with pesto!

Heat up your grill pan over medium-high heat and spray it with oil.
Put the buttered side of the bread on the grill pan and start to build.
I did turkey, mozzarella and a drizzle of balsamic vinegar.
I meant to add the arugula at this step, but I was distracted and forgot!
Don't be like me and remember to add your arugula!!!

Once the bread starts to get nice and toasted,
add the other slice of bread and flip over to grill that side.

After both sides are toasted and your cheese is nice and melted,
remove and let cool on a cutting board for about a minute.
Slice in half and you're ready to eat!

Since I forgot the arugula, I whipped up a small salad to have with it instead.

Now go make one for yourself!
I think your stomach will thank me.