Wednesday, January 29, 2014

Apple and Onion Pork Loin "Roast"


In this post, I told you about the AMAZING Pork Loin Roast I made on my stovetop because my oven was broken. (Note - my oven is fixed now, but it wasn't fixed the next day as I'd hoped.)

I already told you about the deliciousness, so let me show you how I made it!
Original recipe can be found here.

The Goods:
Pork Loin
Apples
Onion
Apple Juice
Chicken Stock
Olive Oil
Salt
Pepper
Bay Leaf

Heat olive oil over high heat and sear pork on all sides.
Add apple juice, broth, sliced apples, onion and bay leaf. 
Bring to a boil, reduce heat and simmer for an hour and a half or longer depending on size of pork.

 Once cooked, remove the pork, the apples and the onions.
Let the pork rest and then slice.

 Raise heat, bring the liquid to a boil and reduce until thick.
Serve over the sliced pork with apples and onions on the side!

Sunday, January 26, 2014

Potato, Ham and Cheese Quiche

A few weeks ago, my friend Renee told me about a quiche she had made with ham. After hearing all about it, I KNEW I wanted to make myself a quiche with ham very soon! 

I couldn't wait very long - I made the quiche just a few days later and had it for dinner with Elina. My ham quiche was a little different than Renee's, but I'm sure both were quite tasty! 

The Goods:
Pie Crust
Eggs
Milk
Cream
Ham
Cheddar Cheese
Cubed Potatoes
Onion
Salt
Pepper

Mine had thick cut ham, shredded medium cheddar cheese, cubed potatoes and sauteed onions. 
Oh and eggs, of course eggs!

Once everything is prepped, putting the quiche together only takes a few minutes. But then you have to wait about 40 minutes to enjoy the deliciousness! 


It's worth the wait though, I promise!


Elina and I enjoyed the quiche with homemade salsa and a chopped salad.

Bloglovin

Happy Sunday!

I've known about bloglovin' for awhile, but I had been too busy (read lazy) to actually sign up... 

That is until today!!!

Bloglovin' is great. 

If you're anything like me, you probably read more than one blog and bloglovin' makes it so easy to catch up on all your favorites. It puts all the blogs you follow in one place for you to easily get caught up!! You don't have to check multiple different sites to see who has new posts, you just simply check bloglovin' to see who has updated!

I wish I hadn't waited so long to join.

And since I'm now on bloglovin', you can now all follow MY BLOG there!! 
Just simply sign up, and click this link to start following me.

Sunday, January 19, 2014

Caramelized Sweet Potato Rounds

Sorry for the lack of post recently folks.
I've been quite busy with work,
but I've also been busy working on new posts about some super tasty food!
And I hope to have a decoration post up soon too.
Maybe even a garden one too, but don't hold your breath...

Anyway, now that I've said my sorries, below you can read all about a super easy and amazingly tasty way to make Sweet Potatoes.

On Thanksgiving, someone showed me a recipe for Caramelized Sweet Potato Rounds and my mouth was watering at just the thought of them! I knew immediately that I had to attempt to make these sucker because I love sweet potatoes and they sounded simply amazing! 

The recipe I was shown called for baking the potatoes whole, slicing them and then baking as rounds. 
I didn't really like that idea and thought that baking them as rounds from the beginning would be easier AND faster in the long run. 

Take a look below at how easy these little things are to make:

The Goods:
Sweet Potatoes
Olive Oil
Sea Salt
Butter
Brown Sugar
Baking Sheet(s)

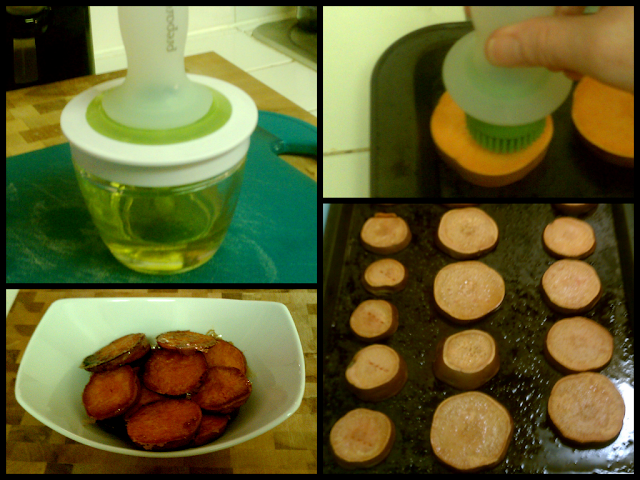
Slice potatoes, brush on olive oil and sprinkle with salt.
Bake at 350 for 10 minutes, flip and bake about 10 minutes more - until fork tender.
Spread butter on sweet potatoes and sprinkle with brown sugar.
Bake fore 5 to 10 minutes, flip, add more butter and brown sugar and bake about 5 more minutes.
Remove from pan with spatula.

I was right, it was both easier and faster! And they were just as delicious as I thought they'd be! 

Go make them - you won't be disappointed!!! 

Sunday, January 5, 2014

Sunday Night Dinner: Take 36

It's been awhile since I posted a Sunday Night dinner post.
My entire schedule has been all messed up due to the holidays, 
but I'm pretty sure it's back to normal - at least for now!

So as some of you know - my oven is broken!
It worked Friday night, but refused to preheat last night.
It should be fixed tomorrow...

But that didn't help me tonight when I wanted to make 
A ROASTED Pork Loin, ROASTED Potatoes and ROASTED Broccolini.

I was sad.
I had already gone grocery shopping and everything.
I wanted my roasted Sunday Night Dinner gosh darn it!

But I realized there was nothing I could do, so I found a different recipe instead!

I made a completely different meal than I originally planned...


I made this AMAZING Pork Roast (look for a future blog about this - it's THAT good!!), Whole Wheat Egg Noodles and Steamed Broccolini.

While this meal was not what I'd originally intended to make tonight, 
I'm SO happy that I ended up making everything I did.
And one of the best parts is that I get to enjoy this meal again as leftovers tomorrow night!!

Saturday, January 4, 2014

Elina's Birthday Celebration 2013

We'd been planning to go ice skating for Elina's birthday for OVER A YEAR!
We even had to postpone it again this year, but only by one weekend.
We weren't going to let another year go by without ice skating for her birthday!

When we did finally get to go, we went ALL out for the Birthday Girl!!!

A few Saturdays ago, Elina, Robin and myself made our way to the Ice Skating Rink in Santa Monica!

After renting our skates and locker, it was time to hit the ice!!

Not pros, but none of us fell!!!

We skated for a bit, but then decided we should give our feet a lil rest and find some food.
We walked to the Santa Monica Pier, taking a quick stop to admire the setting sun!

Just us three goofing around.

After a few pictures, it was off to The Lobster for a delicious dinner.

We watched the sun set as we devoured some tasty food.

With stuffed bellies, we made our way back to the ice rink but made a pit stop for some Hot Cocoa!
We skated a little more and then made a stop to see Santa before heading home.


Once home, the Birthday Girl blew out some candles on a Strawberry Shortcake!!


Hope you had an AMAZING Birthday Elina!!!
We love you and had tons of fun celebrating the day with you!
xoxo


Thursday, January 2, 2014

GG's Christmas Fudge

Growing up, I remember my mom making multiple recipes that came from my Great Grandma,
who we called G.G.
They were all so tasty and I'm honored to be the one making them now!

I've shared with you her amazing Banana Bread recipe.

And now I want to tell you about her delicious Fudge!!!

I don't remember a Christmas during my childhood that my mom didn't make this fudge.
In fact, I also recall both my brother and I requesting it for our birthdays once or twice.
It was a big hit in our house growing up, that's for sure!

It's pretty easy to make too.
It's really about timing everything that's key.

Take a look below at the fudge making process!


GG's Fudge
  • 10 Big Marshmallows
  • 1 Tablespoon Water
  • 1 1/2 Cup Chocolate Chips
  • 1 Stick Unsalted Butter
  • 1 Teaspoon vanilla
  • 2 Cups Sugar
  • 3/4 Cup Evaporated Milk
  1. Put Chocolate Chips, Butter and Vanilla in large mixing bowl and set aside.
  2. Slow boil the Sugar and Evaporated Milk. Bring to a rolling boil and stir for about 5 minutes.
  3. While Sugar and Evaporated Milk are boiling, melt the Marshmallows with the water.
  4. Pour both the Sugar and Evaporated Milk mixture AND the melted Marshmallows over the Chocolate Chips, Butter and Vanilla. 
  5. Mix until everything is incorported and creamy.
  6. Add chopped nuts if desired (OPTIONAL but I usually use Chopped Walnuts)
  7. Spread out mixture in a 9x9 baking dish that's lined with wax/parchment paper.
  8. Chill in fridge AT LEAST 24 hours before cutting.
  9. Cut into squares and place in mini muffin liners for serving.