Showing posts with label Carrots. Show all posts

Sunday, September 25, 2016

Lemongrass Chicken Banh Mi

I consider myself a pretty big foodie and  I love trying new foods!
I am pretty picky so I don't always love everything that I try,
but when one of my best friend introduced me to Bahn Mi sandwiches,
I immediately knew I wanted to recreated it in my own kitchen!

I did what I do quite often and turned to Google in search of a recipe.
I found quite a few ideas, but decided to use this one,
and modify it slightly to make the sandwiches to my liking.
Keep reading to see how I made them!

The Goods:
Serrano Chilis
Jalapenos
Fresh Lemongrass
Green Onions
Coconut Sugar
Tamari
Rice Vinegar
Carrots
English Cucumber
Radishes
Tomatoes*
Spinach*
Limes
Fresh Ginger
Garlic
Chicken Thighs
French Rolls

*Include in your shopping list if wanting to make salad instead of sandwichs

In a blender, add the following:
2 Serrano chilies - thinly sliced
1 lemongrass stalk -smashed and cut into 1/2 inch pieces
2 green onions - thinly sliced
1 teaspoon coconut sugar
6 tablespoons tamari
1 lime - zested
10 inch piece of ginger - peeled and chopped
2 garlic cloves - peeled and smashed

Puree for about a minute until paste like consistency.

Pour half of the mixture into a large lidded container.

Add your chicken thighs...

And cover with the remaining half of the mixture.

Cover and let marinade for at least 30 minutes,
but can be marinaded for up to 24 hours!

While meat is marinating, make your quick pickled vegetables.

In a medium mixing bowl, whisk together the following:
2 Teaspoons Coconut Sugar, juice from one lime and 3 Teaspoons Rice Vinegar.
Add 2 grated carrots, 1 thinly sliced Serrano chili and 1/3 of an English cucumber.
Mix well and let sit at least 10 minutes, or refrigerate overnight. 

Heat your grill to medium high, wipe off excess marinade and place chicken on hot grill.

Grill each side about 5 to 7 minutes.

Let grilled chicken rest a few minutes...

And then chop it all up into bite sized pieces!

Make sure to grill your french rolls so they're nice and toasty,
and then assemble the sandwich to your liking.

Mmm mmm mmmm!

Looking at this picture, I can just taste the deliciousness of the sandwich!

Lemongrass Chicken Banh Mi Sandwich
Adapted from Goop

3 Serrano Chilis
1 Jalapenos**
1 Stalk Fresh Lemongrass
2 Green Onions
2 Teaspoons Coconut Sugar
6 Tablespoons Tamari
3 Teaspoons Rice Vinegar
2 Carrots Carrots
1/3 English Cucumber
2 Radishes**
3 Limes
10 inch Piece Fresh Ginger
2 Cloves Garlic
1 1/2 Pounds Chicken Thighs
French Rolls

**Used for Sandwich Garnish

  1. In a blender, add 2 Serrano chilies - thinly sliced, 1 lemongrass stalk -smashed and cut into 1/2 inch pieces, 2 green onions - thinly sliced, 1 teaspoon coconut sugar, 6 tablespoons tamari, 1 lime - zested, 10 inch piece of ginger - peeled and chopped and 2 garlic cloves - peeled and smashed. Puree for about a minute until paste like consistency.
  2. Pour half of the mixture into a large lidded container, add the chicken thigh and cover with the remaining half of the mixture. Cover and let marinade for at least 30 minutes, but can be marinaded for up to 24 hours.
  3. While meat is marinating, make your quick pickled vegetables. In a medium mixing bowl, whisk together the following: 2 Teaspoons Coconut Sugar, juice from one lime and 3 Teaspoons Rice Vinegar. Add 2 grated carrots, 1 thinly sliced Serrano chili and 1/3 of an English cucumber. Mix well and let sit at least 10 minutes, or refrigerate overnight. 
  4. Heat your grill to medium high, wipe off excess marinade and place chicken on hot grill. Grill each side about 5 to 7 minutes.
  5. Let grilled chicken rest a few minutes,then chop it all up into bite sized pieces.
  6. Grill the French rolls so they're nice and toasty,and then assemble the sandwich to your liking.

Monday, December 28, 2015

Crock Pot Whole Chicken

This post was supposed to go live yesterday,
but I have been crazy sick the last few days
so I am just now getting around to posting.
My apology!

Years ago my brother told me about the blog 100 Days of Real Food
and how the Crock Pot Whole Chicken recipe is so easy and so tasty.
I tried it soon after we talked and have made it multiple times since.

Not only is it really easy to make, but it has so much flavor too!
It's become one of my favorite ways to make a whole chicken
and the best part is that the crock pot does most of the work!

The Goods:
Whole Chicken
Onion
Carrots
Baby Potatoes
Fresh Thyme
Paprika
Salt
Onion Powder
Garlic Powder
Cayenne Pepper
Black Pepper

Cut up your onion, carrots and baby potatoes, then place in the bottom of your crock pot.
You don't want these too small, but more like bite sized pieces.

Combine all your spices and then rub the mixture ALL over the cleaned chicken.
Place chicken on top of the onions, carrots and potatoes in the crock pot.

Cover with the lid and cook on high for at least 5 hours,
or until the chicken meat is falling off the bones.

After about five hours, you'll have super flavorful chicken, carrots and potatoes.

Totally optional - but I like to make a gravy using the liquid from the crock pot.

Make up a plate, grab yourself a drink and enjoy this yummy dinner!

Crock Pot Whole Chicken
Adapted from 100 Days of Real Food

Whole Chicken
1 Large Yellow Onion
4 Large Carrots
12 Baby Potoatos
4 Sprigs Fresh Thyme
2 Teaspoons Paprika
1 Teaspoon Salt
1 Teaspoon Onion Powder
1/2 Teaspoon Cayenne Pepper
1/4 Teaspoon Black Pepper

  1. Cut up your onion, carrots and baby potatoes, then place in the bottom of your crock pot.
  2. Combine all your spice and then rub the mixture ALL over the cleaned chicken.
  3. Place chicken on top of the onions, carrots and potatoes in the crock pot.
  4. Cover with the lid and cook on high for at least 5 hours or until the chicken meat is falling off the bones.
  5. Optional - make gravy with liquid from the crock pot.

Sunday, June 1, 2014

Homemade Soup: Vegetable Soup!

Now that it's practically Summer, it's pretty warm out
so I doubt many of you are in the mood for some soup.

That's a shame because I recently made an AMAZING Vegetable Soup.
I researched recipes online for awhile and I didn't find anything I loved.
So, I combined two recipes (here and here) and sorta just did my own thing!

So take a look below at how I made my Homemade Vegetable Soup.

The Goods:
Frozen Lima Beans 
Frozen Corn 
Frozen Peas 
Spinach 
Garlic 
Onion 
Leeks 
Broccoli 
Green Bean 
Carrots 
Tomatoes 
Potatoes 
Parsley 
Salt 
Pepper 
Vegetable Broth

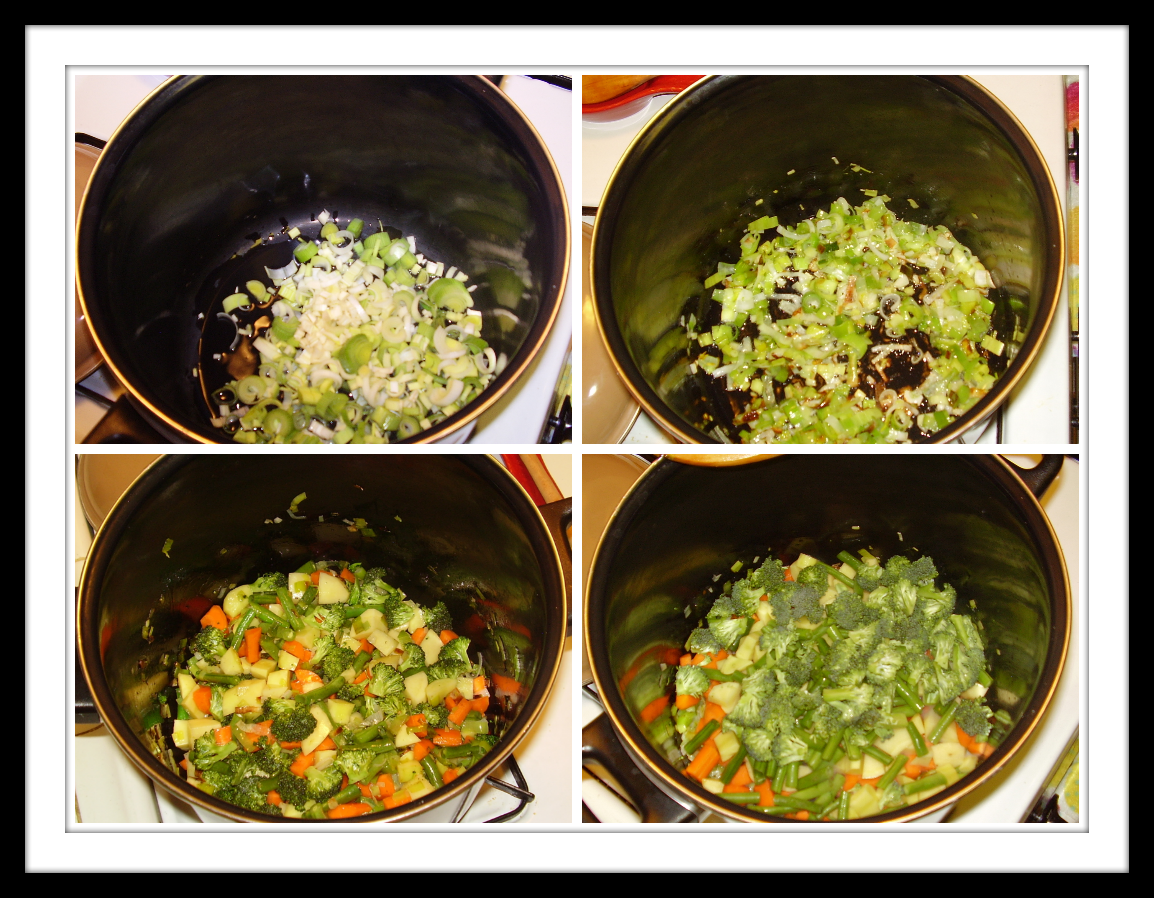
Chop and measure everything out.

Cook the leeks, onion and garlic.
Season with salt and pepper.
Add the potatoes, carrots, green beans and broccoli.
Season with salt and pepper again!
Cook for three or so minutes.

Add the broth.
Season with salt and pepper.

Add the tomatoes, corn, peas and lima beans.
Stir and then add the spinach and stir again!
Season with salt and pepper once more!!!

It made A LOT!!

It was so light and delicious.
And I cannot wait to make it again!!

If soup isn't your thing during the Spring and Summer, 
remember this recipe and make it when you are in the mood for soup! 

Saturday, April 26, 2014

Asian Quinoa Salad

For awhile, I have been making a Grain Greek Salad for lunches on a pretty regular basis.
Not too long ago, I decided I wanted to look for other grain salads.
I specifically set out to find quinoa recipes and quickly found one I knew I wanted to try!
Asian Quinoa Salad sounded great and I couldn't wait to make it!

The Goods:
Quinoa
Sesame Oil
Soy Sauce
Rice Vinegar
Sesame Seeds
Crushed Red Peppers
Cilantro
Ginger
Cabbage
Red Bell Pepper
Cucumber
Shredded Carrots
Edamame

Make the dressing, chop the veggies and cook the quinoa.
Then combine in one bowl and mix it all together.
Refrigerate at least a few hours before serving.

I made this salad for lunches one week,
and it was SO good that I decided I needed to blog about it.
So I made it for a second week in a row in order to document the process.

It's so simple and so tasty!
I can't wait to make it again to be honest.


Sunday, November 17, 2013

Homemade Spaghetti and Turkey Bolognese!

I hadn't made homemade pasta in awhile, so a few weeks ago I busted out my trusty pasta maker and went to town! I made half a recipe of a simple egg dough, letting it rest for a few hours before rolling it out and cutting it into spaghetti.

 I usually serve my homemade pasta with a simple marinara or an olive oil based sauce, but this time I wanted to change things up and give turkey bolognese a try! I'd never made a bolognese  but I thought I could handle it! After looking at a few recipes, I decided on this yummy sounding one from Giada de Laurentiis.

Take a look below at the process of making both the pasta dough and the sauce.

The Pasta Goods:
Flour
Eggs
A lil Salt 
THAT'S IT!

Put flour in a big bowl and make a well. Crack the eggs and mix them in with a fork until dough is starting to come together. Continue to mix it a little longer by hand.

Then dump it onto a floured surface and go to town kneading. 
I kneaded the dough for about 5 minutes, give or take. 

The top shows what it should look like when you're done kneading.
Wrap it in plastic warp and let it rest for a few hours, or even a few days in the fridge!

Once you're ready to use the dough, cut into 4 pieces. Flour the top and form each piece into a flattened disk. Run the dough through the pasta machine and then cut into spaghetti.  

Now that the pasta is done, let me tell you all about the sauce!

The Bolognese Goods:
Ground Turkey
Crushed Tomatoes
Celery
Carrot
Onion
Garlic
Basil
Flat Leaf Parsley
Parmesan Cheese
Olive Oil
Salt
Pepper

Prep all your goods!

Heat a little olive oil, sauté your onions and garlic. Once onions are translucent, add the carrots and celery and cook a few minutes. Then add the ground turkey and cook completely. Finally, add the crushed tomatoes and fresh herbs. Stir everything to combine and simmer for about 30 minutes. 

Since I made fresh pasta, it only needs to cook for a few minutes. While that was cooking, I added fresh parmesan to the sauce. Toss the sauce with the pasta and save a little sauce to add on top. I served mine with homemade garlic bread and some oven roasted corn on the cob. 

Sunday, April 21, 2013

Garden Highlights

I don't have time to do a full garden update, but there are some fun and exciting things happening in my garden so I had to share the highlights! Since I'm limited on time, this post will be mostly pictures, but check back soon for a more in depth look at the ever changing garden!

The carrots have sprouted!!!

Holy Jalapenos!
20 peppers and counting folks. 

New Cat Grass. 
The meow meows are happy!

The FIRST Raspberry blossom!
I can't waittttttt to see what happens!!!

Three new Poppy buds. 

And a rose is blooming!
I can't remember the last time this happened actually.

Don't forget to check back soon for a longer update on the garden!!!

Tuesday, April 2, 2013

An Easter Feast!

This year wasn't the first time I spent Easter away from my family, but this year WAS the first year I decided to make myself my own Easter Feast!

Ever since I spent the first Easter away from my family, I've wanted to recreate an Easter "Dinner". And I say "Dinner" because to be honest, in my family Easter "Dinner" was always closer to 2PM.  To me - that's more of an Easter LUNCH! Does anyone else's family do this? And why don't we just call it what it is?!? Anyway... since I wanted to recreate an Easter Dinner, I decided it only made sense to serve it at a normal dinnertime! :) 

Elina, my favorite cooking partner and one of my best friends, helped me make the amazing feast! I've cooked an entire Thanksgiving Dinner, so I knew I could do this alone too, but let me tell you - Elina made it so much easier! It wouldn't have been the same without her!

Now that I've told you all about the feast, take a look at all the yummy food we got to enjoy!

Started it off the afternoon with some Mimosas! 

Piping the filling in the Deviled Eggs.

Garnished and waiting to be devoured. 

The Ham before putting it in the oven. 

Starting the Au Gratin Potatoes.

Carrots peeled and trimmed.

Mini Cheesecakes waiting to be topped with fruit!

The Finished Ham!

Almost time to eat...

YUMMMMM - Time to dig in!!!

Strawberry and Blackberry topped cheesecakes.

The entire dinner was DELICIOUS, but the ham was by far the BEST ham I have ever had. And it's even amazing as leftovers too! I can't take full credit for how tasty it was because we followed this recipe