Showing posts with label Onion. Show all posts

Sunday, August 28, 2016

Steak & Chicken Kebabs

I purchased a propane grill in May and have been grilling nonstop!
The day I bought it I made a mental note of all the things I wanted to grill.
Kebabs have been a favorite of mine since I was a child,
so they were at the top of the list of yummy foods to make!

I like to marinate what I'll be putting on the kebabs
and that includes not only the meats,
but the variety of veggies you'll be using too.

You can use any marinade you like,
even store bought would be fine,
but I like to whip something together myself!

The Goods Part 1:
Chicken Breasts
Sirloin Steak
Zucchini
Yellow Squash
Bell Peppers
Red Onion

Cut up your meat and veggies so that it's the size of about two bites.
Try to get everything similar sized so your kebabs cook evenly. 

The Goods Part 2:
Olive Oil
Balsamic Vinegar
Fresh Lemon Juice
Course Dijon Mustard
Garlic
Fresh Rosemary
Salt
Pepper

I'm a bad blogger and didn't measure anything out,
so I don't really have instructions for my marinade.
I just dump the goods into a gallon zipper bag, seal and mix up.

Add your chopped meat and veggies to the marinade.
Let sit at least an hour, but up to overnight.

Now the fun begins...time to skewer your kebabs!

I like to do all of the same type of food on one kebab,
because cooking times vary for different foods.

Again, this will help your kebabs cook evenly.

Fill your grill with your kebab skewers and start to cook them.
Keep an eye on them, turning the skewers every few minutes until fully cooked.

MMMmmm my mouth is watering just looking at those kebabs!!!

Remove the food from the skewers and serve with a yummy side like cauliflower rice

And make a little extra because kebab leftovers are some of the best!!!

Sunday, May 29, 2016

Chicken Enchilada Soup

I'm a biggggggg fan of eating soup.
It doesn't really have to be cold out either.
I eat soup year round and always have a bunch in my freezer.

So when I ran across this recipe last Fall I knew I would be making it.
Not too long after finding it, I made it and it was so darn delicious!
I've made it a few more times and knew I had to share because it's that good!

And the best part is that it's made in the slow cooker!
So not only is it really tasty, but it's super easy to make too.
Let me show you how simple it really is.

The Goods:
Chicken Breasts
Yellow Onion
Garlic
Jalapenos
Corn
Bell Pepper
Black Beans
Cilantro
Tomato Paste
Chicken Broth
Cayenne Pepper
Chili Powder
Cumin
Pepper Jack Cheese

Place your raw chicken breasts at the bottom of your slow cooker.

Add your diced bell pepper, jalapeno, onion and garlic.

Next add your dice tomatoes, black beans and corn.

Now time to add the chicken broth.

And finally the spices and tomato paste.

Stir everything up until it's mixed well.

Cook on high for four and a half hours.

Stir in minced cilantro and shredded pepper jack cheese.
Cook for about 30 more minutes.

Remove chicken from slow cooker and shred.
Return to soup, mix in and serve yourself a bowl!

Dig in and enjoy as is!

Or add something extra like soup cream or avocado!!!

Chicken Enchilada Soup
Adapted from Carolina Charm

2 large Chicken Breasts
1 Large Yellow Onion - Diced
4 Cloves Garlic - Minced
2 Large Jalapenos - Minced
2 Cups Frozen Corn
1 Bell Pepper - Diced
1 Can Black Beans - Rinsed and Drained
1 Bunch Cilantro - Minced
(2) 14.5 Ounce Cans Diced Tomatoes
1/2 Cup Tomato Paste
3 Cups Chicken Broth
1/2 to 1 Teaspoon Cayenne Pepper
2 Teaspoons Chili Powder
2 Teaspoons Ground Cumin
1/2 Cup Pepper Jack Cheese - Shredded
  1. Place your raw chicken breasts at the bottom of your slow cooker.
  2. Add your diced bell pepper, jalapeno, onion and garlic.
  3. Next add your dice tomatoes, black beans and corn.
  4. Now time to add the chicken broth.
  5. And finally the spices and tomato paste.
  6. Stir everything up until it's mixed well.
  7. Cook on high for four to four and a half hours.
  8. Stir in minced cilantro and shredded pepper jack cheese and cook for about 30 more minutes.
  9. Remove chicken from slow cooker and shred. 
  10. Return to soup, mix in and serve yourself a bowl!

Tuesday, March 22, 2016

Roasted Cauliflower Quinoa Bites

and then following those up with Quinoa Pizza Bites,
I decided that I really liked the ease of eating these,
so I set out to make a brand new version of my own!

I'm a big fan of the flavor of roasted cauliflower,
so I knew right away I'd be using that.
And after tossing a few ideas around with a co-worker,
I knew I wanted to include lemon and parmesan as well.

Let me show you how easy it is to make these tasty
Roasted Cauliflower Quinoa Bites!!!

The Goods:
Quinoa
Roasted Cauliflower
Yellow Onion
Garlic
Eggs
Lemons
Parmesan Cheese
Salt
Pepper
Parsley Flakes

Cook quinoa according to your package directions.

In a large bowl, combine your cooked quinoa, roasted cauliflower, 
diced onion, minced garlic, both eggs, most of your parmesan cheese, salt, 
pepper and parsley to your liking, lemon juice and zest and mix to combine.

Stuff filling into greased mini muffin pans
and top with remaining parmesan cheese.

Bake at 350 degrees for 20 to 30 minutes,
until tops are nice and crisp.

Cool in muffin pans for about 5 minutes,
then remove and finish cooling on wire rack.

Roasted Cauliflower Quinoa Bites

3/4 Cup Uncooked Quinoa
1 1/2 Cups Water
2 Cup Roasted Cauliflower
1/2 Cup Diced Yellow Onion
2 Cloves Minced Garlic
2 Eggs
Salt, Pepper and Parsley To Taste
1 Cup Shredded Parmesan Cheese
Juice and Zest from 1/2 a Lemon
  1. Cook your quinoa according to package directions.
  2. Roast your cauliflower (I did mine with juice and zest from 1 lemon, salt, pepper and olive oil.)
  3. In large bowl combine everything (reserve 1/4 of the cheese for topping) and mix well.
  4. Stuff filling into greased mini muffin pans and top with remaining cheese.
  5. Bake at 350 degrees for 20 to 30 minutes until tops are nice and crisp.
  6. Cool in muffin pans for about 5 minutes, then remove and finish cooling on wire rack.


Monday, December 28, 2015

Crock Pot Whole Chicken

This post was supposed to go live yesterday,
but I have been crazy sick the last few days
so I am just now getting around to posting.
My apology!

Years ago my brother told me about the blog 100 Days of Real Food
and how the Crock Pot Whole Chicken recipe is so easy and so tasty.
I tried it soon after we talked and have made it multiple times since.

Not only is it really easy to make, but it has so much flavor too!
It's become one of my favorite ways to make a whole chicken
and the best part is that the crock pot does most of the work!

The Goods:
Whole Chicken
Onion
Carrots
Baby Potatoes
Fresh Thyme
Paprika
Salt
Onion Powder
Garlic Powder
Cayenne Pepper
Black Pepper

Cut up your onion, carrots and baby potatoes, then place in the bottom of your crock pot.
You don't want these too small, but more like bite sized pieces.

Combine all your spices and then rub the mixture ALL over the cleaned chicken.
Place chicken on top of the onions, carrots and potatoes in the crock pot.

Cover with the lid and cook on high for at least 5 hours,
or until the chicken meat is falling off the bones.

After about five hours, you'll have super flavorful chicken, carrots and potatoes.

Totally optional - but I like to make a gravy using the liquid from the crock pot.

Make up a plate, grab yourself a drink and enjoy this yummy dinner!

Crock Pot Whole Chicken
Adapted from 100 Days of Real Food

Whole Chicken
1 Large Yellow Onion
4 Large Carrots
12 Baby Potoatos
4 Sprigs Fresh Thyme
2 Teaspoons Paprika
1 Teaspoon Salt
1 Teaspoon Onion Powder
1/2 Teaspoon Cayenne Pepper
1/4 Teaspoon Black Pepper

  1. Cut up your onion, carrots and baby potatoes, then place in the bottom of your crock pot.
  2. Combine all your spice and then rub the mixture ALL over the cleaned chicken.
  3. Place chicken on top of the onions, carrots and potatoes in the crock pot.
  4. Cover with the lid and cook on high for at least 5 hours or until the chicken meat is falling off the bones.
  5. Optional - make gravy with liquid from the crock pot.

Sunday, April 26, 2015

Mini Turkey Meatloaves

Growing up I remember my mom making meatloaf countless times.
It's not a meal I've eaten regularly as an adult,
but I recently had a craving for some that wouldn't go away!

So what'd I do?
I gave her a call and asked for her recipe of course!
I made a few small changes, but it still tasted like I remember as a child.

The Goods:
Ground Turkey
Shredded Wheat
Milk
Onion
Egg
Fresh Herbs
Salt
Pepper

Dump everything in a big bowl and mix it up.
I used my hands (clean of course!) because they make the best tools.
And because that's how my mom did it when I was little.

Once mixed well, transfer to your baking dish.
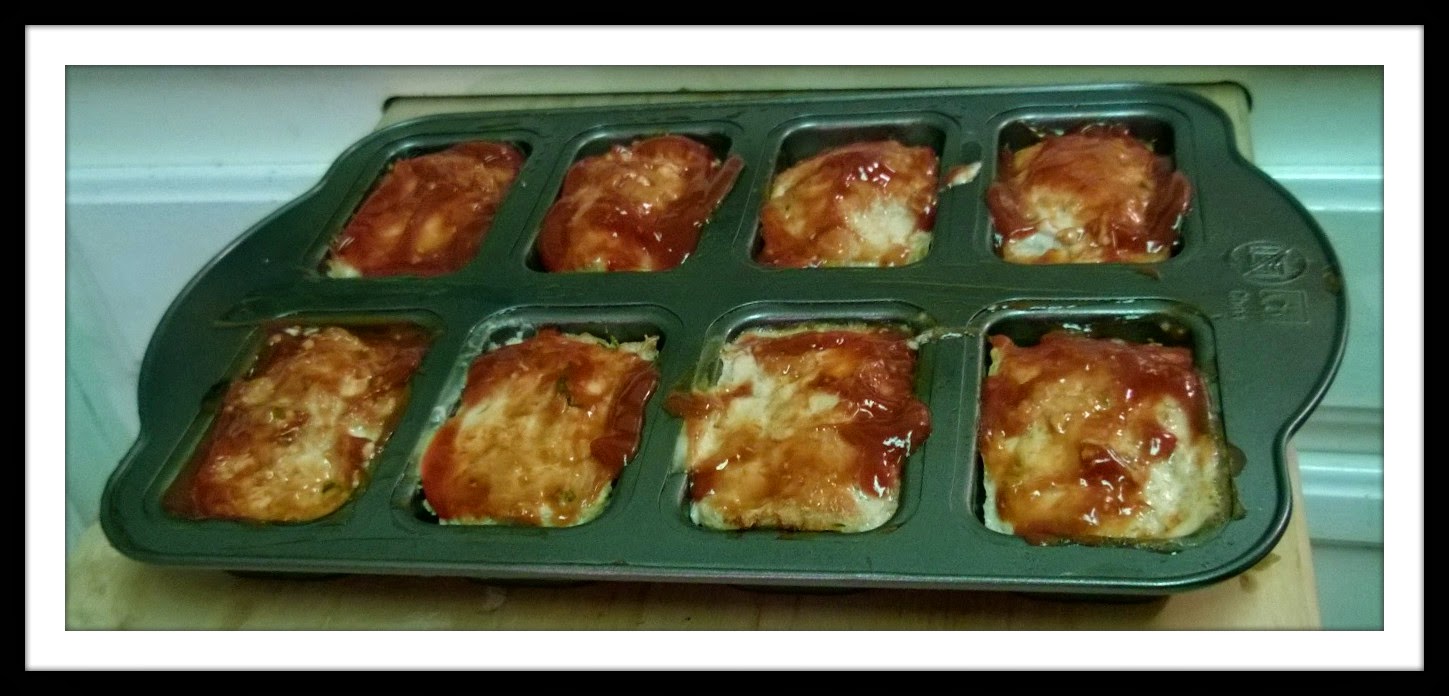
I wanted mini loaves, but use whatever dish you desire!

Bake at 350 degrees for about 20 minutes.
Remove from the oven and brush tops with ketchup.
Return to the oven and bake 20 to 25 more minutes.

No one ever said that meatloaf was a pretty meal,
but man does it sure taste great!
Comfort food at it's finest, people!

Serve warm with some yummy sides.
I chose mashed sweet potatoes and roasted broccoli - YUM!

Mini Turkey Meatloaves
1 1/4 Pound Ground Turkey
1 Cup Shredded Wheat
1 Medium Onion - diced
1 1/4 Cups Milk
1 Egg
1 Teaspoon Salt
1/4 Teaspoon Pepper
Fresh Herbs to your liking

  1. Preheat oven to 350 degrees.
  2. Add all ingredients to a large bowl and mix well. 
  3. Transfer mixture to your greased baking dish(es) and bake for about 20 minutes.
  4. Remove from oven and bush top of loaves with ketchup.
  5. Return to the oven and bake 20 to 25 more minutes.


Wednesday, February 4, 2015

Chicken Spaghetti

When I first saw this recipe, I didn't know exactly what to think.
I knew I was intrigued, but I'd never made anything like it, 
so I wasn't exactly sure what to expect taste wise.

I put off making it and sorta forgot about it for awhile.
and I knew right then and there that I had to try it!

Keep reading to see how it's made,
and to find out what I really thought after tasting.

The Goods:
3 Cups Rotisserie Chicken
1 Package Spaghetti
1/4 Cup Onion - Diced
1/4 Cup Bell Pepper - Diced
 1 Can Cream of Chicken Soup
2 Cup Cheddar Cheese - Shredded
1 Teaspoon Seasoned Salt
1/4 Teaspoon Cayenne Pepper
Salt and Pepper to Taste
2 Cups Chicken Broth
(Not pictured - OOPS!)

Get all your ingredients ready - 
Shred, chop, dice, you know!

Boil your water and cook your spaghetti until al dente.
Drain and return to cooking pot.

Add all but 1 Cup cheese and mix well.

Put mixture into greased baking pan - or two if you're like me!
Cover generously with cheese.

Bake at 350 for about 45 minutes.

OR

If you're like me...

Bake one and freeze one to be enjoyed soon!

I
In the freezer ready to be baked and eaten.

So I bet you're curious what I thought.
That's probably the only reason you read this far!
Well...I love it!
I am so glad I made two
and I can't wait to eat it again!!!

Sunday, November 2, 2014

Sausage Stuffed Zucchini Boats

I haven't posted a food blog recently,
so I figured it was time I did so!
Hope you enjoy!!!

While browsing recipes online awhile back,
I ran across one that I knew I wanted to make soon!
It wasn't like anything I'd ever made and I was intrigued.

So after having the recipe for months,
I finally decided that it was time to make
SAUSAGE STUFFED ZUCCHINI BOATS!!!
I followed the recipe linked above,
Check out how I made this tasty meal below.

The Goods:
Zucchini
Italian Sausage
Onion
Garlic
Marinara Sauce
Mozzarella Cheese
Parmesan Cheese

Cook your sausage,
grate your cheeses,
scoop out your zucchini and
dice up the scooped out part!

Make sure your zucchini boats are clean and dry.

And drain your sausage to remove the grease.

Saute your onions and garlic.
Add diced up zucchini and cook a few minutes.
Add the cooked sausage and combine well.

Put a little sauce on the bottom of your dish.
Then lay out zucchini boats and then fill with mixture.
Top with more sauce and both cheeses.

Now you can either pop this in the oven 
and bake for 30 to 35 minutes at 400 degrees.

All done!

Can you say YUMMY!??!

If you don't want to bake it right away,
or if you want to bake half now and save half for later,
you can seal it up very well and freeze to bake soon!
I tend to use plastic wrap AND zipper baggies.

Sunday, October 12, 2014

Individual Turkey Sloppy Joe Portions

I've always loved Sloppy Joe's.
They're easy and tasty and remind me of being a kid.
But since I'm usually cooking for just myself,
I didn't make them too often.

Why?
Because I didn't want to eat them for so many meals in a row.
That is until I got smart!

One day I decided I would make a whole batch,
eat a helping and freeze the rest in individual servings.
GENIUS!!!

You could do this with any Sloppy Joe recipe,
but keep reading and see how I made mine!

The Goods:
1 Pound Ground Turkey 
1/2 Cup Chopped Onion 
1/2 Cup Chopped Green Pepper 
2 Tablespoons Water 
1/2 Teaspoon Garlic Salt 
8 Ounces Ketchup 
Dash or Two Hot Sauce 
1 Teaspoon Worcestershire Sauce 
1 to 2 Teaspoons Chili Powder
Hamburger Rolls (Not Pictured)

Chop up your Green Pepper and Onion.

Saute the Green Pepper and Onion, 
then add your meat and start browning.
Once cooked, remove as much excess oil/fat from the pan.
Add the remain ingredients, stir and simmer for 5 minutes or so.

If your'e not freezing any, serve and enjoy!
But if you are freezing some keep reading.

Put liners in muffin pans and spoon in Sloppy Joe mixture.
Flash freeze in freezer for an hour or two.
Remove from muffin pan and packaged individually.
Freeze in freezer bag until ready to use!