
One of my coworkers recently made herself a Quilted Tote Bag.
I liked it when I saw it, but liked it even more after talking to her about it.
Lucky me - she offered to make me my very own!
And just a few short days later, she was handing it to me.
I was very excited about my new tote bag,
and even showed it off to a few other coworkers!
Driving home that night I had a light bulb go off in my head:
ASK SANDIE TO DO A DIY GUEST POST ABOUT THE BAG!!!
Lucky me again - not only was she super awesome and agreed,
but she already had a bunch step by step pictures taken!
So enough outta me - I'll let Sandie take over,
so she can tell you all about the Quilted Tote Bag she made!
Hi I'm Sandie and I've worked with Robyn for years now.
We're always talking about fun little projects we're making
and now I get to share a recent one with you!
Want to see other DIY project I've made? Then head here!
Since the first bag I made was an experiment of sorts, I didn't take photos.
But, after completing it and finding it smaller than I expected, I decided I wanted to rework it.
Fortunately, Robyn said she loved it, so that gave me reason to make this amended version.
Let's get started...

THE GOODS:
(18) 5" x 5" squares (I used a charm pack, but you can cut your own, if preferred)
(1) 8" x 15" piece of fabric for the bottom
(1) 18" x 25" fabric for the lining (this is approximate, you'll need to trim to fit)
(2) 4" x 15 piece of fabric for the handles
(1) 1 1/2 x 5" piece of fabric for the button loop
(1) 17" x 27 piece of batting - it should be a couple of inches bigger than the outside of your bag.
(1) Button
BEFORE YOU START SEWING, CUT ALL OF YOUR PIECES,
SO YOU CAN MOVE THROUGH EACH STEP EASILY.
FRONT:
Select 18 squares and organize them into your preferred design. You'll use 8 for each side of the bag (4 per row). Once you have the design laid out, start sewing each row together with right sides together and 1/4" seams. You should now have 4 rows. Press your seams with iron, then with right sides together sew 2 rows together, lengthwise. Press your seams and you'll now have 2 panels.

Attach the bottom, with right sides together sew each panel to each length of of the bottom fabric, and then press your seams. Now let's add the batting. Lay out your batting, then lay your whole front side on it (right side up). Spray baste or pin, smoothing out as you go to eliminate wrinkles.

Now you are ready to quilt. If you are an experienced quilter, quilt away, but if not, you can use the simple method of straight lines, which is what I did. I made one line down the middle and then continued lines at about 3/4" apart (you could also use a zig zag stitch to give your lines some character). Once you have finished quilting trim the edges of your batting.

Let's make this look more like a bag. Fold the quilted top in half, right sides together and sew side seams (1/4") so that the seams between the bottom piece and the charms line up. (Pin if needed)
Next we are going to create the bottom of the bag. Pull the sides apart until the sides form a triangle and the seam is centered. Measure 1-1/2" from the corner, draw or pin and then sew straight across. Trim each corner to 1/4" seam. This will make the bottom approximately 3" across. The deeper your triangle, the wider your bottom will be, so make it your own.
LEAVE YOUR BAG TURNED INSIDE OUT.

We're about half way there, so hang in there!
LINING:
Fold the lining fabric in half, right sides together and then sew 1/4" seams along each side. Leave a 4" opening on one of the sides so you can turn the bag. Then form the corners the say way you did the front piece. TURN YOUR LINING RIGHT SIDE OUT.

HANDLE & BUTTON CLOSURE:
Press the handle strips in half lengthwise, right side out. Open, and press the outer edges towards the middle. Fold closed and press. Stitch down the length of the handle about 3 or 4 times.

NOW IT'S TIME TO ASSEMBLE!!!
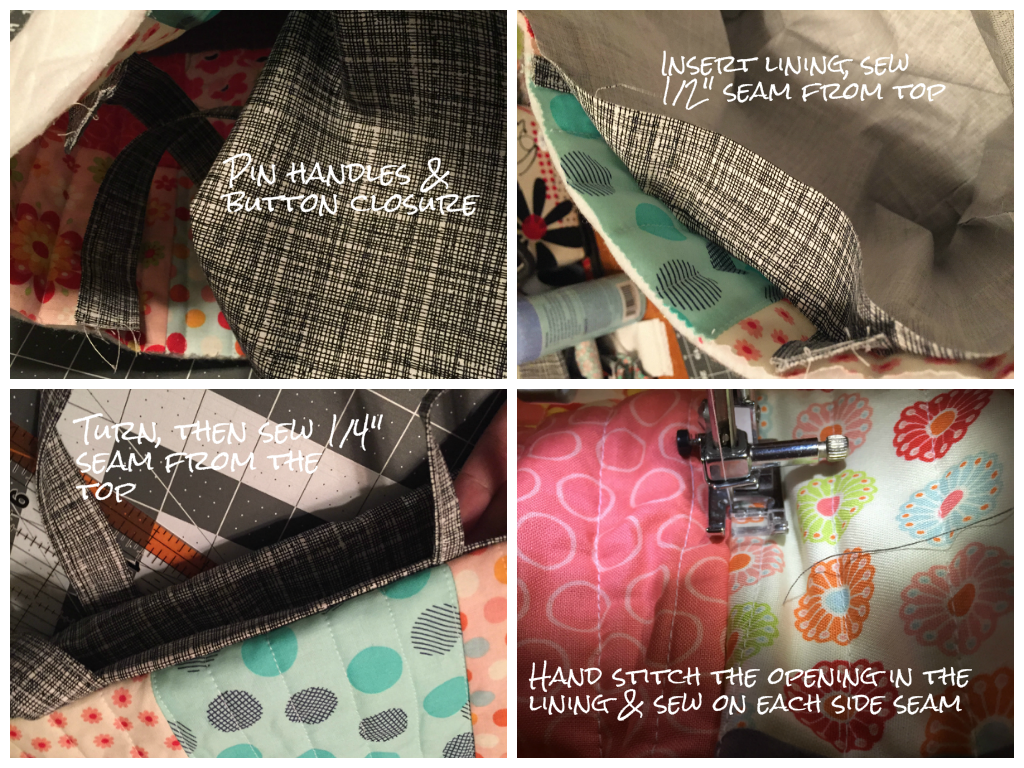
Pin your handles into the quilted piece of the bag. The wider you set your handles the shorter they will be, so make sure you line them up. The handles should sit inside the bag, so that once the bag is turned, they are on the outside. Now do the same with the button closure, making sure to center it.
Next you are going to insert the lining into the quilted bag. Since your lining is right side out when you drop it in, the pieces will be right sides together. Pin the lining to the top then stitch around the top about 1/2" down from the top.
Using the opening in the lining, pull your bag through and turn the whole bag right side out.
YOU'RE ALMOST THERE...
Tuck the lining down into the bag and then topstitch a 1/4" from the top.
Now line up your button with the closure and sew it on.

Technically your bag is now done! HURRAH!!
But, I added a few finishing touches...
#1 - After you turn your bag, hand stitch the opening closed.
This will keep things from sneaking through to the middle of your bag.
#2 - I added a side stitches to keep the lining from moving around.
On the outside from the top, I stitched inside of the existing seam
("stitch in the ditch", is the quilters lingo).

AND THAT IS THAT!!
Having learned the process from the first bag, I was able to get this second one done in an evening.
The final size of the second bag was 9 1/2" x 17".
Thanks for your time, I hope you find this project as much fun as I did.
I liked it when I saw it, but liked it even more after talking to her about it.
Lucky me - she offered to make me my very own!
And just a few short days later, she was handing it to me.
I was very excited about my new tote bag,
and even showed it off to a few other coworkers!
Driving home that night I had a light bulb go off in my head:
ASK SANDIE TO DO A DIY GUEST POST ABOUT THE BAG!!!
Lucky me again - not only was she super awesome and agreed,
but she already had a bunch step by step pictures taken!
So enough outta me - I'll let Sandie take over,
so she can tell you all about the Quilted Tote Bag she made!
Hi I'm Sandie and I've worked with Robyn for years now.
We're always talking about fun little projects we're making
and now I get to share a recent one with you!
Want to see other DIY project I've made? Then head here!
Since the first bag I made was an experiment of sorts, I didn't take photos.
But, after completing it and finding it smaller than I expected, I decided I wanted to rework it.
Fortunately, Robyn said she loved it, so that gave me reason to make this amended version.
Let's get started...

THE GOODS:
(18) 5" x 5" squares (I used a charm pack, but you can cut your own, if preferred)
(1) 8" x 15" piece of fabric for the bottom
(1) 18" x 25" fabric for the lining (this is approximate, you'll need to trim to fit)
(2) 4" x 15 piece of fabric for the handles
(1) 1 1/2 x 5" piece of fabric for the button loop
(1) 17" x 27 piece of batting - it should be a couple of inches bigger than the outside of your bag.
(1) Button
BEFORE YOU START SEWING, CUT ALL OF YOUR PIECES,
SO YOU CAN MOVE THROUGH EACH STEP EASILY.
FRONT:
Select 18 squares and organize them into your preferred design. You'll use 8 for each side of the bag (4 per row). Once you have the design laid out, start sewing each row together with right sides together and 1/4" seams. You should now have 4 rows. Press your seams with iron, then with right sides together sew 2 rows together, lengthwise. Press your seams and you'll now have 2 panels.

Attach the bottom, with right sides together sew each panel to each length of of the bottom fabric, and then press your seams. Now let's add the batting. Lay out your batting, then lay your whole front side on it (right side up). Spray baste or pin, smoothing out as you go to eliminate wrinkles.

Now you are ready to quilt. If you are an experienced quilter, quilt away, but if not, you can use the simple method of straight lines, which is what I did. I made one line down the middle and then continued lines at about 3/4" apart (you could also use a zig zag stitch to give your lines some character). Once you have finished quilting trim the edges of your batting.

Let's make this look more like a bag. Fold the quilted top in half, right sides together and sew side seams (1/4") so that the seams between the bottom piece and the charms line up. (Pin if needed)
Next we are going to create the bottom of the bag. Pull the sides apart until the sides form a triangle and the seam is centered. Measure 1-1/2" from the corner, draw or pin and then sew straight across. Trim each corner to 1/4" seam. This will make the bottom approximately 3" across. The deeper your triangle, the wider your bottom will be, so make it your own.
LEAVE YOUR BAG TURNED INSIDE OUT.

We're about half way there, so hang in there!
LINING:
Fold the lining fabric in half, right sides together and then sew 1/4" seams along each side. Leave a 4" opening on one of the sides so you can turn the bag. Then form the corners the say way you did the front piece. TURN YOUR LINING RIGHT SIDE OUT.

HANDLE & BUTTON CLOSURE:
Press the handle strips in half lengthwise, right side out. Open, and press the outer edges towards the middle. Fold closed and press. Stitch down the length of the handle about 3 or 4 times.

NOW IT'S TIME TO ASSEMBLE!!!
Pin your handles into the quilted piece of the bag. The wider you set your handles the shorter they will be, so make sure you line them up. The handles should sit inside the bag, so that once the bag is turned, they are on the outside. Now do the same with the button closure, making sure to center it.
Next you are going to insert the lining into the quilted bag. Since your lining is right side out when you drop it in, the pieces will be right sides together. Pin the lining to the top then stitch around the top about 1/2" down from the top.
Using the opening in the lining, pull your bag through and turn the whole bag right side out.
YOU'RE ALMOST THERE...
Tuck the lining down into the bag and then topstitch a 1/4" from the top.
Now line up your button with the closure and sew it on.

Technically your bag is now done! HURRAH!!
But, I added a few finishing touches...
#1 - After you turn your bag, hand stitch the opening closed.
This will keep things from sneaking through to the middle of your bag.
#2 - I added a side stitches to keep the lining from moving around.
On the outside from the top, I stitched inside of the existing seam
("stitch in the ditch", is the quilters lingo).

AND THAT IS THAT!!
Having learned the process from the first bag, I was able to get this second one done in an evening.
The final size of the second bag was 9 1/2" x 17".
Thanks for your time, I hope you find this project as much fun as I did.
You might also like this website which is for fashion bags:Tote Bags
ReplyDelete