Tuesday, June 28, 2016

Things I'm Lovin' Tuesday: Desert Nova The Hip Bag

This is a non-sponsored review and all opinions are 100% my own.

A few months ago I started another monthly blog series called
THINGS I'M LOVIN' TUESDAY!!!
Past post can be found:
hereherehereherehereherehereherehere AND here.
And make sure to check back every last Tuesday of the month!

Now onto what I'm lovin' this month...


One of my dear friends recently came out with a great bag!
When she first told me about it I was a little skeptical about the idea,
but after seeing it in person and feeling the quality,
I knew it was something great and I wanted one ASAP!


To start off - these bags are really cute!!!
The details are high quality and simply amazing.


While I'm not a music festival goer like my friend,
I knew I could make use of it in many different situations myself.
There are many times it's easier to not carry a bag and have a free hand.
And it's even better if you still look really cute!

I could have used it last year at Tacolandia!
I could use it while horseback riding even!!
How would YOU wear your bag???


Sunday, June 26, 2016

Grilled Pizzas!

One of my best friends introduced me to grilled pizza a few years ago.
I was hooked from the first bite and even shared about them in 2012!
I promised I'd share about them soon and I guess I failed on that.
Or that soon is apparently almost four years later...whoops!

These pizzas are well worth the wait though.
They are a step up from your regular pizza with a smokey grilled flavor.
And while basic pizza toppings like pepperoni are always good,
unique flavors like these below are by far my favorite!

The Goods:
Pizza Dough
Dates
Prosciutto
Thyme
Mozzarella Cheese
Tomatoes*
Baby Greens or Arugula*
(*Not Pictured)

Cut dough in half, stretch out and then grill both sides on cast iron grill pan.

Add your topping to each pizza dough.
I did date, prosciutto and thyme on one
and fresh diced tomatoes and prosciutto on the other.

Grill with top covered for 5 to 10 minutes, 
until bottom is crisp and cheese is melted.

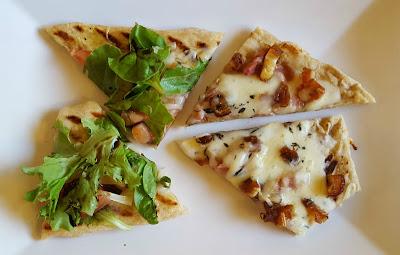
I added a bunch of baby greens and more fresh tomatoes to the one without dates.

Fresh tomato, prosciutto and baby greens.

Date, prosciutto and thyme.

Yummmmmmmmmmmmmy!

Now go make yourself some grilled pizza.
You and your stomach will be very happy!

Date and Prosciutto Grilled Pizzas
1 Package Premade Pizza Dough
5 to 6 Dates, Chopped
4 Slices Prosciutto, Chopped
4 to 5 Sprigs Thyme, Leaves removed from stems
1 to 1 1/2 Cups Shredded Mozzarella Cheese

  1. Cut dough in half, stretch out and then grill both sides on cast iron grill pan.
  2. Add your topping to each pizza dough.
  3. Grill with top covered for 5 to 10 minutes, until bottom is crisp and cheese is melted.
  4. Cut and devour immediately! 

This post contains affiliate links meaning I may get a paid for certain purchases.

Wednesday, June 15, 2016

Bubble Bath Review: Philosophy Dazzling Diamond

This is a non-sponsored review and I purchased my own Bubble Bath.

I've always wanted to try Philosophy products,
but the cost of them has always made me shy away.
I recently found one on sale somewhere and snatched it up.
I really wanted to see if it was worth the regular price.


Bubble Bath, beer and headphones for music!


Just like most bubble baths I've reviewed, 
simply pour a good amount under running water.

Ahhhhh bubbles! 
Lots and lots of bubbles!

Sit back with your cold beer, soak, and relax.

So was it worth the money?
100% worth it!
I would totally pay full price.
It's one of my favorite bubble baths to date.

This post contains affiliate links meaning I may get a paid for certain purchases.

Sunday, June 12, 2016

DIY: Gallery Wall

I have quite a few framed pictures around my apartment,
and I've always loved the look of gallery walls,
so I decided I'd make my own on the den's biggest wall.

Meter stick, pencil and level.
Not pictured - Clear Command Hooks*

Before hanging anything, I laid it out on the floor.
It took rearranging a few times to get it just how I wanted.

Some frames didn't have hooks so I added something like this.


I had three rows so I hung the middle row first.

Then hung the top and bottom rows in columns. 

Keep going. It's a little tedious, but in my option it's worth it in the end!

Halfway through I decided I didn't like the way some frames were hanging,
so I decided too rip the stands off the backs of frames that had them.

ANDDDDDDD Done!
I really really really love the way the the wall turned out and love the mix of pictures with decor.


*These were a great idea in theory, and were super easy to apply,
but I've had many fall off since originally hanging
and it's becoming a pain to hang them again and again.
Nails sadly may be the best bet for this project.

Saturday, June 11, 2016

Raspberry Muffins

Earlier this year I made the best blueberry muffins ever
and I shared this picture of them on Instagram.
I unfortunately didn't take any pictures to blog about those,
but just a few weeks later I decided to swap out the blueberries
and make raspberry muffins following the same recipe!

I'm going to warn you now - this post was almost a fail.
Luckily I put on my thinking cap and figured out a way to save them.
But since I made the mistake, you guys might too.
And I figured it was best to confess my mistake and
also show you what I did to fix it.

Keep reading to see how they're made and how I screwed up in the process.
HAHA #bloggerfail

The Goods:
All-Purpose Flour
Sugar
Salt
Baking Powder
Vegetable Oil
Eggs
Milk
Raspberries
Butter
Ground Cinnamon
Lemon Zest (Not Pictured)

In a large bowl, combine the following:
3 cups flour, 1 1/2 cups sugar, 1 teaspoon salt, 
4 teaspoons baking powder and zest from one lemon.

In medium bowl, combine the following:
1 cup sugar, 2/3 cup flour and 3 teaspoons cinnamon.
Set aside. 

In a large measuring cup, add 2/3 cup vegetable oil and two eggs.
Then add enough milk (about 2/3 cup) to make 2 cups total and mix well.

Pour the milk mixture into the large mixing bowl with the flour mixture.
Stir to combine, being careful not to over mix.


Carefully fold your raspberries into the dough.

Cube 1/2 cup of softened butter...

And add to the medium bowl of flour mixture you'd set aside.
Mix the cubed butter in with a folk until mixture is crumbly.

Carefully fill each muffin cups about 3/4 of the way full.

Then add the crumb topping to each.

Bake at 400 degrees for about 25 minutes.
Test that they're done by inserting a toothpick.
If it comes out clean your muffins are done baking!

Remove from oven, cool in pan for a minute or two,
and finish cooling on a wire rack.

Now here's where I realized these were almost a failure...

The pretty muffin cups I was using had a max temperature of 350 degrees,
but silly Robyn sadly didn't pay attention to that little detail.

And I ended up burning the bottoms of probably 75% of the muffins!
(Insert super sad face here.)

After being sad for a few minutes, I decided to try to remedy the situation
by removing the muffins from the cups and then chopping off the burnt bottoms.

That's a lot of wasted pretty little muffin cups! 

But in the end, the muffins turned out great!
The wrappers weren't nearly as pretty as I'd hoped....

But they tasted pretty darn amazing!

And I was able to give them away in cute little packaging as planned.  

Raspberry Crumb Muffins
Adapted from All Recipes

For the Muffins:
3 Cups All-Purpose Flour
 1 1/2 Cupa Sugar
1 Teaspoon Salt
4 Teaspoons Baking Powder
2/3 Cup Vegetable Oil
2 Eggs
2/3 Cup Milk
2 Cups Fresh Raspberries
Zest from One Lemon

For the Crumb Topping:
1 Cup Sugar
2/3 Cup All-Purpose Flour
1/2 Cup Butter, Cubed
3 Teaspoons Cinnamon

  1. In a large bowl, combine 3 cups flour, 1 1/2 cups sugar, 1 teaspoon salt,  4 teaspoons baking powder and zest from one lemon.
  2. In medium bowl, combine 1 cup sugar, 2/3 cup flour and 3 teaspoons cinnamon. Set aside. 
  3. In a large measuring cup, add 2/3 cup vegetable oil and two eggs. Then add enough milk (about 2/3 cup) to make 2 cups total and mix well.
  4. Pour the milk mixture into the large mixing bowl with the flour mixture. Stir to combine, being careful not to over mix.
  5. Carefully fold your raspberries into the dough.
  6. Cube 1/2 cup of butter and add to the medium bowl of flour mixture you'd set aside. Mix the cubed butter in with a folk until mixture is crumbly.
  7. Fill each muffin cups about 3/4 of the way full. Fill rest of the way with crumb topping.
  8. Bake at 400 degrees for about 25 minutes. Test that they're done by inserting a toothpick. If it comes out clean your muffins are done baking!
  9. Remove from oven, cool in pan for a minute or two, and finish cooling on a wire rack.

Thursday, June 9, 2016

David's Famous Salsa!

Growing up in Tucson Arizona,
my best friend's dad made some amazing salsa.
I always wondered how he made it,
but he always said there wasn't really a recipe.

Over the years, I wasn't the only one that asked about it,
so somehow a fairly good recipe was put together
and lucky me, I was able to get my hands on it

I was home visiting earlier this year and saw my friend's family.
I hadn't seen her dad in probably 15 years and it was great to catch up.
I asked him permission to share his recipe on my blog,
and since you're reading this, he of course said yes!

So without saying anything more,
let me show you how this yummy salsa is made!

The Goods:
Tomato Sauce
Whole Peeled Tomatoes
Salt
Oregano Leaves
Garlic
Garlic Powder
Green Onions
Cilantro
Dried Chili Tepins
Limes
Red Wine Vinegar

First thing you want to do is get all your ingredients prepped.

Chop up an entire bunch of green onions and set aside.

Mince one to two garlic cloves so you have a full teaspoon.

Chop up one entire bunch of cilantro and set aside.

Slice your limes in half.

In a blender, add ingredients in the following order:
Half the can of whole tomatoes (and juice), 
three quarters of the chopped green onions, 
all of the chopped cilantro, 
juice from the limes, 
red wine vinegar, 
salt, 
a sprinkle of garlic powder, 
minced garlic, 
crushed chili tepins, 
oregano leaves, 
the rest of the whole tomatoes, 
the rest of the green onions 
and last but not least the tomato sauce!!!

Blend well for about a minute. 
And that's it for a batch of David's salsa!

As you can see in the photo above,
this recipe makes quite a bit of salsa!
Knowing that, I've been known to make a batch for myself
and then give a lot of it away to coworkers and friends.

Sometimes I take a little more time and package it up in cute mini mason jars!

David's Famous Salsa
1 (15 oz) Can Tomato Sauce
1 (28 oz) Can Whole Peeled Tomatoes
2 Teaspoons Salt
1/2 Teaspoon Oregano Leaves
1 Teaspoon Garlic, Minced
Sprinkle of Garlic Powder
1 Bunch Green Onions, Chopped
1 Bunch Cilantro, Chopped
1 FULL Teaspoon Dried Chili Tepins, Crushed
3 to 4 Limes
1 Tablespoon Red Wine Vinegar

  1. In a blender, add ingredients in the following order:
    • Half the can of whole tomatoes (and juice)
    • Three quarters of the chopped green onions
    • All of the chopped cilantro
    • Juice from the limes
    • Red wine vinegar
    • Salt
    • Sprinkle of garlic powder
    • Minced garlic
    • Crushed chili tepins
    • Oregano leaves
    • The rest of the can of whole tomatoes
    • The rest of the green onions
    • Last but not least the tomato sauce
  2. Blend well for about a minute. 
  3. Store in airtight jar for about a week or two.