Showing posts with label Friends. Show all posts

Monday, October 3, 2016

Baked Donut Monday: Lavender with Blueberry Glaze

Happy Monday everyone!!!
I'm back again for another Baked Donut Monday post
and today I'm going to tell you about some super tasty
LAVENDER BAKED DONUTS 
WITH BLUEBERRY GLAZE!

One of my close friends went lavender picking in Ojai earlier this year.
She dried it out and then asked me if I wanted some to use for crafts of cooking.
I, of course, said yes and went to town looking for recipes using it.
I was ecstatic when I found a baked donut recipe using lavender.

I made it very soon after and was quite intrigued by it's taste.
I'd never had anything like it before and it got better with every bite.
I shared these donuts with some of my closest friends,
and they too agreed that it just kept getting better and better.

The Goods:
Lavender
Ground Flax Seed
Olive Oil
Maple Syrup
Vanilla Extract
Apple Cider Vinegar
Gluten Free All-Purpose Flour
Baking Soda
Salt
Powdered Sugar
Blueberries
Almond Milk

Add 1 tablespoon dried lavender to 1/2 cup warm water.

Steep for about 30 minutes.

Strain lavender tea and set aside.

Process 3 tablespoons flax seed with 1 teaspoon dried lavender until fine.

In a small bowl, combine the flax seed and lavender mixture
with the lavender tea, whisk well and set aside at least 5 minutes.
This is your "egg" in the recipe.

Combine gluten free all purpose flour, salt and baking soda. Set aside.

In a large bowl, combine flax seed "egg" mixture with olive oil, 
maple syrup, vanilla extract and apple cider vinegar and mix well.

Add in the dry ingredient and mix until just combined. 

Transfer donut batter to a large zipper bag.

Cut off the end of the zipper bag 
and fill your greased donut pan until 1/2 to 3/4 full.

Bake at 325 degrees for about 10 minutes.
You can test that they're done with a toothpick.

Cool in the pan for a few minutes.

Remove from pan and finish cooling on wire rack.

While cooling, make your blueberry glaze.

In food processor, combine 1/2 cup powdered sugar, 2 tablespoons blueberries
1 teaspoon vanilla extract and 2 teaspoons almond milk. 
Pulse until smooth, adding extra almond milk if needed to reach desired consistency.

Dip to the top of each donut in the glaze and return to wire rack to set up.


Bite into the donut and enjoy the unique deliciousness!

Lavender Baked Donuts
With Blueberry Glaze
Inspired By food52

For the Donuts:
1/2 Cup Warm Water
4 Teaspoons Dried Lavender
3 Tablespoons Ground Flax Seed
1/4 Cup Olive Oil
1/3 Cup Maple Syrup
1 Teaspoon Vanilla Extract
1 Teaspoon Apple Cider Vinegar
1 Cup Gluten Free All-Purpose Flour
1/2 Teaspoon Baking Soda
1/2 Teaspoon Salt

For the Glaze:
1/2 Cup Powdered Sugar
2 Tablespoons Blueberries
1 Teaspoon Vanilla Extract
2 Teaspoons Almond Milk

  1. Add 1 tablespoon dried lavender to 1/2 cup warm water. Steep for about 30 minutes. Strain lavender tea and set aside.
  2. Process 3 tablespoons flax seed with 1 tablespoon dried lavender until fine.
  3. In a small bowl, combine the flax seed and lavender mixture with the lavender tea, whisk well and set aside at least 5 minutes. This is your "egg" in the recipe.
  4. Combine gluten free all purpose flour, salt and baking soda. Set aside.
  5. In a large bowl, combine flax seed "egg" mixture with olive oil, maple syrup, vanilla extract and apple cider vinegar and mix well.
  6. Add in the dry ingredient and mix until just combined. 
  7. Transfer donut batter to a large zipper bag.
  8. Cut off the end of the zipper bag and fill your greased donut pan until 1/2 to 3/4 full.
  9. Bake at 325 degrees for about 10 minutes.You can test that they're done with a toothpick.
  10. Cool in the pan for a few minutes. Remove from pan and finish cooling on wire rack.
  11. While cooling, make your blueberry glaze. In food processor, combine 1/2 cup powdered sugar, 2 tablespoons blueberries,1 teaspoon vanilla extract and 2 teaspoons almond milk. Pulse until smooth, adding extra almond milk if needed to reach desired consistency.
  12. Dip to the top of each donut in the glaze and return to wire rack to set up.

Tuesday, September 27, 2016

Things I'm Lovin' Tuesday: Farmer's Markets!

This is a non-sponsored review and I purchase my own Farmer's Market goodies.

Last year I started a monthly blog series called
THINGS I'M LOVIN' TUESDAY!!!
Past post can be found:
here, here, here, here, here, here, here, here, here, here, here, here and here!!
And make sure to check back every last Tuesday of the month!

Now onto what I'm lovin' this month...


I've been going to farmer's markets for years.
There's a great little one just a few miles from my house on Sundays.
But I was recently introduced to two other amazing ones in Los Angeles.

I had heard good things about the Calabasas Farmer's Market
and just a few Saturdays ago I finally went for the first time.
While it was bigger than the farmer's market in Encino,
parking was a little more of a hassle unless you wanted to pay.

My boyfriend took me to the Brentwood Farmer's Market recently
and it was by the best farmer's market I've ever been to!
It was huge and the quality of the goods were amazing.
And parking is surprisingly pretty easy for the area on a Sunday.

What are your favorite goodies to buy at the farmer's market?

And if you're Los Angeles local - what's your favorite farmer's market in the area?

Friday, September 16, 2016

Grilled S'mores!

Summer will be gone in less than a week.
And while I'm REALLY excited for Fall,
(Hello boots, scarves and sweaters!!!),
I'm going to miss a few things about Summer.

And one of those things is s'mores!

Of course you can make s'mores year-round,
but there's just something about the hot Summer months
that just make it perfect for s'more making!!!
I even started my Summer making them Memorial Day weekend at the beach.

Now if you're like me and crave s'more year round,
I have a super easy solution for you!
Having a nice bonfire to roast your marshmallow is nice,
but it's not a necessity for s'more making.

I bought a grill this Summer and was grilling everything possible.
I quickly realized I didn't need a bonfire to make s'more,
and could use my newly purchased grill instead.
You don't get the same effect as sitting around a fire, but they're just as tasty!!!

The Goods:
Large Marshmallows*
Chocolate Bars
Graham Crackers

*I purchased S'mores specific marshmallows with HIGH hopes,
but sadly they didn't roast as easily as regular large marshmallows.
The weight distribution seemed off or something.

Get all your ingredients prepped before starting to roast your marshmallows.

My grill has easily removable plates,
so I took them off to get closer to the flame.

Roast the marshmallows on a stick like usual.

Once your marshmallow is golden brown and gooey,
 sandwich between two graham crackers and some chocolate.

Take a bite of the deliciousness,
 getting marshmallow all over your face,
and enjoy this yummy treat!


Tuesday, August 30, 2016

Things I'm Lovin' Tuesday: Carbolite FroYo

This is a non-sponsored review and I purchased my own froyo.

Last year I started a monthly blog series called
THINGS I'M LOVIN' TUESDAY!!!
Past post can be found:
here, here, here, here, here, here, here, here, here, here, here and here!
And make sure to check back every last Tuesday of the month!

Now onto what I'm lovin' this month...

I've always been a fan of frozen yogurt.
I mean really, what's not to love?
My boyfriend introduced me to carbolite this summer
and I was in heaven from the very first bite!
It tastes like regular froyo, but with a fraction of the calories!!!

Below is a sampling of some of the carblolite we've enjoyed recently.


They have many flavors and I've tried a bunch over the last few months.
If you can find some near you, you should give it a try.
I haven't been disappointed yet!

Saturday, July 9, 2016

Elina's Chocolate Mousse

I used to cook with one of my best friend's all the time!
Her and her husband used to live down the hall from my apartment,
and she and I were known to throw down in the kitchen quite often.

Sadly, they moved out of my complex a few years ago,
and while we do cook together from time to time still,
it's not as easy and doesn't happen very often.

I haven't posted any "Elina and Robyn Make..." posts in a long time
(a few past posts can be found here, here, here and here!),
but she's here today, as a guest blogger, to share a yummy dessert she made!

Hi guys! I'm backkkkkkkkk! (sorta)
I've really missed being a part of Robyn's blog,
so today I'm sharing how to make some Chocolate Mousse!

I've made it many times and always follow this recipe.
It's pretty easy, but just takes a little patience.
Let me show you how it's made!

The Goods:
Bittersweet Chocolate Chips
Heavy Cream
Egg Whites
Sugar
Sweetened Whipped Cream

Start by getting your ingredients prepped.

Weigh out your chocolate, measure out your cream and sugar,
and finally separate your egg whites. 

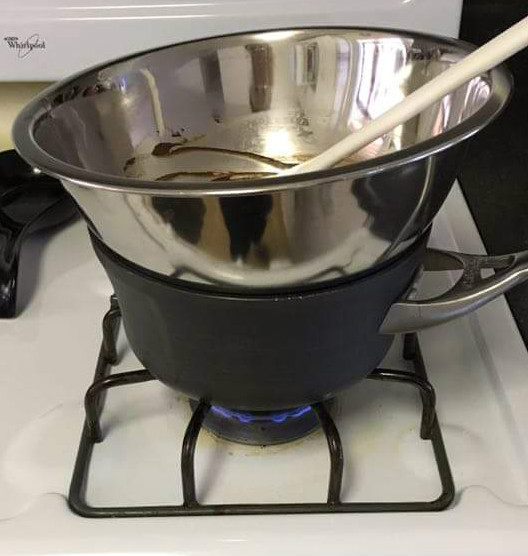
Put chocolate in a large metal (or glass) bowl over a pan with low simmering water.
You're creating a double boiler to melt the chocolate.

Stir the chocolate until melted, then turn off the heat and let stand.

In another large bowl, beat the cream over a bowl of ice until soft peaks form.

Set aside and keep at room temperature.

Whip egg white until soft peaks form...

Gradually add in the sugar...

And continue to whip until firm.

Fold the firm egg whites into the melted chocolate and mix with a whisk.
When almost completely incorporated....

Add the whipped cream and fold in. 

Cover and refrigerated for about an hour - until mousse is set.

Portion out the chocolate mousse into ramekins...

And finally top with more whipped cream!

Elina's Chocolate Mousse
Inspired by Bobby Flay

5 1/4 Ounces Bittersweet Chocolate Chips
14 Ounces Cold Heavy Cream
3 Egg Whites
1 Ounce Sugar
Additional Whipped Cream for topping.
  1. Weigh out the chocolate, measure out the cream and sugar,and separate your egg whites. 
  2. Put chocolate in a large metal (or glass) bowl over a pan with low simmering water.
  3. Stir the chocolate until melted, then turn off the heat and let stand. 
  4. In another large bowl, beat the cream over a bowl of ice until soft peaks form. Set aside and keep at room temperature. 
  5. Whip egg white until soft peaks form, gradually add the sugar and continue to whip until firm.
  6. Fold the firm egg whites into the melted chocolate and mix with a whisk. When almost completely incorporated, add the whipped cream and fold that in too.
  7. Cover and refrigerated for about an hour - until mousse is set.
  8. Portion out the chocolate mousse into ramekins and top with more whipped cream.


Wednesday, July 6, 2016

Whiskey Wednesday: Kickin' Blood Orange Spritzer

Happy Wednesday guys!!!
Over a year ago, I started a fun new blog series - 
Whiskey Wednesday!!!

If you missed them, here are past posts:
Irish Mule
 Mint Julep
Bourbon & Sparkling Lemonade
Irish Redhead
Old Fashion
Jameson Coke Floats
Bourbon Cherry Coke
Bourbon Spiked Apple Cider
Hot Toddy
Whiskey Sour
Sage Brown Derby
Strawberry Whiskey Smash
Gold Rush
Blackberry Whiskey Punch

As you can see, I've made quite a few whiskey drinks so far.
Whenever I run across a recipe that sounds appealing,
I make a note to make it soon and include it in this monthly blog series.

While I originally set out to make a variation of this recipe,
I wasn't able to track down blood oranges or even blood orange juice,
so I did the next best thing and created a brand new drink!

The Goods:
Whiskey
Orange Juice
Blood Orange San Pellegrino
Jalapeno

Get all your ingredients prepped and measured out.

Add ice, whiskey, orange juice and sliced jalapenos 
to a cocktail shaker and shake for about 30 seconds. 

Strain mixture into two small glasses.

The liquid should fill about half of each glass.

Finally, top with chilled Blood Orange San Pellegrino.


Cheers your friend, take a sip and enjoy!
Warning - there's quite a kick to these from the jalapenos!!!

Kickin' Blood Orange Spritzer
(Makes 2 Drinks)
4 Ounces Whiskey
1/2 Cup Orange Juice
1 Can Blood Orange San Pellegrino
1 Fresh Jalapeno, Sliced

  1. Add ice, whiskey, orange juice and sliced jalapenos to a cocktail shaker and shake for about 30 seconds. 
  2. Strain mixture into two small glasses. It should fill about half of each glass.
  3. Finally, top with chilled Blood Orange San Pellegrino.
  4. Cheers your friend, take a sip and enjoy!