Monday, October 5, 2015

Whiskey Wednesday: Jameson & Coke Float

Happy Wednesday everyone!!!
A few months ago, I started a fun new blog series - 
Whiskey Wednesday!!!

If you missed them, here are the last few:
Irish Mule
 Mint Julep
Bourbon & Sparkling Lemonade
Irish Redhead
Old Fashion

Make sure to check back each month for a new recipe!
Whiskey Wednesday will happen every first Wednesday of the month.

This month's Whiskey Wednesday post kinda fell in my lap.
While killing some time at the mall recently,
 I spotted a jar of Vanilla Bourbon Caramel sauce
and I knew I had to include it in Whiskey Wednesday somehow.

After tossing a few ideas around with some friends,
I decided I'd be using the sauce in some kind of soda float.
While I do love a good root beer float,
this is Whiskey Wednesday so I needed a lil more whiskey!

So I did the only logical thing,
and turned a Jameson and Coke into an adult float,
that included the Vanilla Bourbon Caramel sauce too!
And here's how to make it:

The Goods:
Jameson
Coke
Vanilla Ice Cream

Start by pouring one shot of Jameson into each glass.

Followed by a generous scoop of vanilla ice cream.


 Now it's time to open up the Vanilla Bourbon Caramel Sauce.

Yummmmm!
I think I could eat this by itself...

And drizzzzzzzzzzzzzle all over the ice cream!

Add the last ingredient to make the float - coke.
Make sure that the coke is extra cold 
and if it's not feel free to throw in an ice cube or two!

Add some bendy straws and serve to your guests!

While I'm sure a Jameson and Coke float alone would be great,
the addition of the Vanilla Bourbon Caramel sauce took this drink to the next level!

Baked Donut Monday: Gluten Free Pumpkin Donuts!

Happy Monday you guys!!!
I'm back again for another Baked Donut Monday post
and today I'm going to tell you about some super tasty
GLUTEN FREE PUMPKIN DONUTS!!!

When thinking about the next donut to make,
I knew I wanted it to be something different
and when a friend suggested gluten free,
I knew I had to find one to try.

After very little searching,
I found a pumpkin one that sounded AMAZING.
While I don't need to eat gluten free myself,
I know enough people that do so I decided to give it a go!

The Goods:
Vegetable Oil
Eggs
Sugar
Pumpkin Puree
Pumpkin Pie Spice
Salt
Baking Powder
Gluten Free Flour
Cinnamon

    In a large bowl, beat together the oil, eggs and sugar.
    Add the pumpkin puree, pumpkin pie spices, salt 
    and baking powder, then beat until mixture is smooth.
    Next add the flour and mix until incorporated.

     Transfer donut batter to a large zipper bag.

    Cut off the end of the zipper bag 
    and fill your donut pan until 1/2 to 3/4 full.

    Bake at 350 degrees for about 15 minutes.
    Cool in pan for a few minutes.

    Remove donuts from pans and let them continue to cool.

    While donuts are still slightly warm, 
    shake them in an bag with cinnamon-sugar mixture...

    Until all of the donuts are coated!

    MMMMMMM donuts!


    Surprise! I added chocolate chips to just a few!!!

    Ready to be delivered to neighbors and friends!

    While these were pretty tasty,
    I think that from now on,
    I'll stick to donuts that have gluten in them.

    Past donut posts can be found:
    herehereherehere herehere and here!

    Gluten Free Pumpkin Donuts
    Adapted from King Arthur Flour

    For the Donuts:
    1/4 Cup Vegetable Oil
    4 Eggs
    1 1/2 Cups Sugar
    1 1/2 Cups Pumpkin Puree
    1 1/2 Teaspoon Pumpkin Pie Spice
    1 Teaspoon Salt
    1 1/2 Teaspoons Baking Powder
    1 3/4 Cups + 2 Tablespoons
    Gluten Free Flour

    For the Coating:
    3 Tablespoons Cinnamon-Sugar
    1. In a large bowl, beat together the oil, eggs and sugar.
    2. Add the pumpkin puree, pumpkin pie spices, salt and baking powder, then beat until mixture is smooth.
    3. Next add the flour and mix until incorporated.
    4. Transfer donut batter to a large zipper bag.
    5. Cut off the end of the zipper bag and fill your donut pan until 1/2 to 3/4 full.
    6. Bake at 350 degrees for about 15 minutes.
    7. Cool in pan for a few minutes.
    8. Remove donuts from pans and let them continue to cool.
    9. While donuts are still slightly warm, shake them in an bag with cinnamon-sugar mixture.

    Wednesday, September 30, 2015

    September Garden Update

    I was so excited about all the new stuff in my garden last month.
    The herbs were thriving and the flowers looked great,
    but then a darn heat wave hit Los Angeles recently
    and I ended up losing almost everything!

    WOMP WOMP

    While I do love having a garden on my balcony,
    I've made the difficult decision and won't be keeping it up for now.
    I don't have the time I used to have to keep it up,
    and if I'm being honest it's become more of a chore than fun.

    So with all the above said,
    I won't be doing monthly updates after this one.
    It's a little sad because my garden is what got this blog going,
    but I'm looking forward to spending more time on cooking, baking and DIY projects.

    Now that I have that outta the way,
    let me show you how my poor little garden looks now!

    Empty pots and window liners make me a little sad.
    But I'm not getting rid or them or anything.
    I have hopes that one day I'll have a garden again!
    Maybe soon, maybe not - we'll see.

    My basil is the last herb that's still around.
    The heat knocked out all the rest sadly.

    I almost got rid of the jalapeno plant,
    but noticed a few new teeny tiny new leaves.
    This plant has amazed me before,
    so maybe, just maybe, it'll start producing again!

    This could very well be the last jalapeno from my garden for awhile.

    There haven't been any new buds or blossoms on the lemon tree in awhile,
    but I'm hoping they start coming when the weather cools down a little more!

    I know I say this every month...
    but I am shocked by how big this Christmas tree is now!
    It started so small and is just HUGE now!!!

    And since this is the last garden post for some time,
    I had to include my cute furry garden helpers!!!


    Tuesday, September 29, 2015

    Things I'm Lovin' Tuesday: Shark Rotator Vacuum

    A few months ago I started another monthly blog series called
    THINGS I'M LOVIN' TUESDAY!!!
    If you missed the first two, you can fine them here and here,
    and make sure to check back every last Tuesday of the month!

    Now onto what I'm lovin' this month...

    I know this is a little strange...but I really enjoy cleaning.
    And having good cleaning products or tools makes it even better.
    A few months ago I was in the market for a new vacuum,
    and my aunt suggested the Shark Rotator 3 in 1 Lift-Away Vacuum.


    I trust my aunt's opinion for many things in life,
    so less than a week later, I purchased the vacuum she suggested.
    Not only was it on sale at Bed Bath and Beyond,
    but I also used a 20% off coupon to make it even cheaper!


    The vacuum was super easy to put together
    and I was able to start cleaning in no time at all!
    It was much quieter than my previous vacuum,
    and it also seemed to pick up SO much more!

    Not only does it work great on both carpets and hard surfaces,
    but it's super simple to switch from one way of vacuuming to another.
    And on top of all that awesomeness - it's SO easy to clean too!
    Oh and I can't forget that it's very light weight as well. 

    Would I purchase this vacuum again?
    You bet I would, but I'm hoping I don't have to for awhile.
    If you're in the market for a new vacuum,
    I absolutely recommend the Shark Rotator 3 in 1 Lift-Away Vacuum.


    Sunday, September 27, 2015

    Spicy Turkey Nachos

    MMMMM nachos!!!
    Boy do I love me some nachos.

    If I'm craving them, I have to have them.
    Otherwise the craving just never goes away.
    I will seriously crave them until I have some!

    And now that I've gone on and on about my love of nachos,
    let me show you how to make some that are super easy and tasty!

    The Goods:
    Tortilla Chips
    Taco Meat
    Spanish Rice
    Black Beans
    Shredded Cheese
    Avocado
    Pickled Jalapenos
    Green Onions
    Plain Greek Yogurt
    Fresh Lime

    I like to layer all the goodies, so I don't end up with all the hearty stuff on top,
    and just sad, dry, boring chips left alone on the bottom.

    For this batch, I did the following:
    A thin layer of chips, followed by meat, beans, and rice.
    Then sprinkled some cheese on top of that layer.
    Followed by two more layers done the exact same way.
    Lastly, I added some jalapenos to the top layer.

    Preheat your oven to 375 degrees,
    then pop your nacho dish in the oven for a few minutes.
    Keep an eye on it, and pull it out when the cheese is melted and bubbly.

    Once it's nice and hot, remove from the oven and
    add fresh squeezed lime, avocado, green onions and greek yogurt.

    Now grab a ton of napkins (this IS finger food) and dig in!!!

    Friday, September 25, 2015

    Favorite Things About Fall

    Happy Friday you guys!!!
    I'm back today for another Friday Link Up!
    And again, I'm linking up with THREE different groups.
    Make sure to check them all out at the bottom of this post!

    Last month I posted about ways to wrap up Summer.
    If you missed that you can read it here.
    And now that it's officially Fall, it's time to talk about my
    FAVORITE THINGS ABOUT FALL!!!

    I don't know about you,
    but when Fall rolls around it's "holiday season" for me!
    No, I'm not talking Christmas and New Years.
    I'm talking about Halloween and Thanksgiving!!!
    Decorating, Celebrating and all that goes with both holidays!

    It's time for Pumpkin EVERYTHING!
    Local stores have been stocking up on pumpkin "stuff" for weeks.
    And that makes me a happy girl.
    I pretty much love pumpkin in anything and everything
    Pie, Ice Cream, Seeds, Puree and more!!

    You can eat squash pretty much all year long,
    but something about Fall just screams squash to me.
    There are many different kinds and ways to prepare squash.
    But three of my favorite type of Fall squash are:
    DelicataButternut and Acorn

    It's been HOT in Los Angeles and I'm ready for it to FEEL like Fall.
    I'm looking forward to cooler weather and the leaves changing...
    But sadly maybe not in LA just yet...
    HAHAHA

    And last but not least bring on the Fall clothing!!!
    I've always loved Fall clothes and I don't see that changing anytime soon.
    Even if it's not cool enough just yet,
    Bring on the SweatersScarves and Boots!

    Now for more Friday Link Up Fun, check out the blogs below!

    Andrea and Erika's blogs from Friday Favorites.

    April's blog from 5 on Friday.


    Karli and Amy's blogs from oh hey friday!

    Tuesday, September 22, 2015

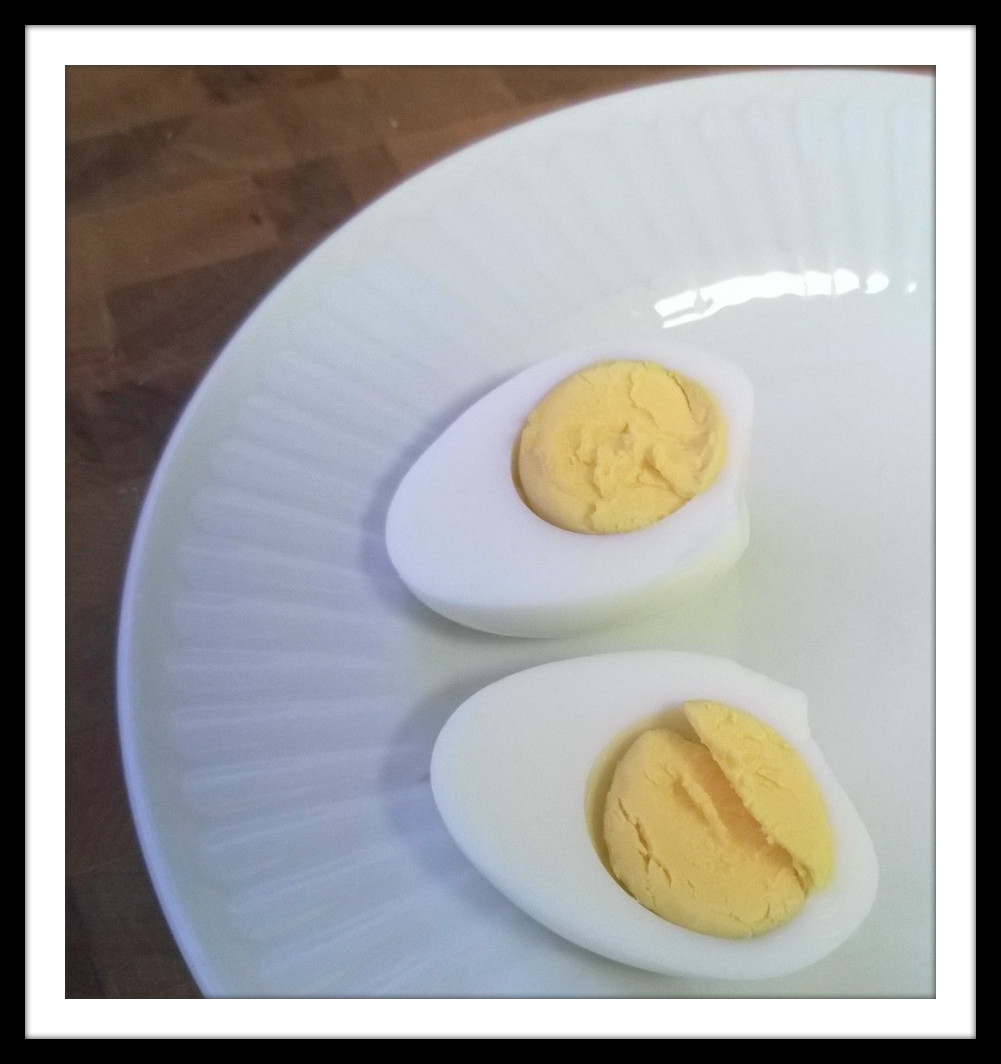
    How To: Hard Boil Eggs

    One of my coworkers asked me how to make hard boiled eggs recently.
    After explaining how I made them, I had a lightbulb go off in my head.

    If one person didn't know how to hard boil an egg,
    I was sure there had to be more people that didn't know how either!

    So today - I'm explain how I hard boil eggs.
    It's super easy and how I've done it for years.

    Put cold eggs in a medium saucepan.

    And add enough water to cover completely. 

    Bring the water to a strong rolling boil.

    Turn the heat off.

    And immediately cover with the saucepan lid.

    Start the timer for 15 minutes.

    And once that's up submerge eggs in ice cold water.

    And that folks - is it. 

    Mmmmm perfectly cooked hard boiled eggs!!!

    While I don't have any special tricks,
    I will say that I find older eggs tend to peel easier,
    and a little better than eggs that are super fresh!

    *Note - this method does not work for all farm fresh eggs.


    Friday, September 18, 2015

    DIY: Burlap Ribbon Wrapped Jar Vases

    I love the look of burlap.
    I use it pretty much whenever I can.
    So when I was planning a little event a few months back,
    you can bet I wanted to incorporate burlap in some way!

    I knew I wanted to have some fresh flowers for decoration,
    and I adore old recycled jars as vases for flower arrangements.
    So I thought it would be a really cute to combine burlap and recycle jars
    and make some adorable DIY vases!

    The Goods:
    Recycled Jars
    Thick Burlap Ribbon
    Thin Burlap Ribbon
    Hot Glue Gun
    Hot Glue


    Measure and cut your ribbon ahead of time.
    And plug your glue gun in to heat up.

    Place a tiny dollop of glue on the jar, followed by one end of the thicker ribbon.
    Wrap around and secure with another dollop of hot glue.
    Trim excess ribbon and repeat steps with thin ribbon.

    Simple, yet cute!


    With some white Mini Calla Lilies from Trader Joe's!