Showing posts with label Parsley. Show all posts

Sunday, November 27, 2016

Butternut Squash Ravioli with Herb Browned Butter


I love butternut squash and I love ravioli.
So when I saw Butternut Squash Ravioli at Trader Joe's recently,
I just had to buy it to try it out.
And guys - it's really yummy!

Not only is it tasty, it's super easy to make too!
I just threw together a simple herb browned butter sauce,
but even just a little butter would be delicious too.
Let me show you how I made mine.


The Goods:
Butternut Squash Ravioli
Butter
Garlic
Thyme
Parsley
Parmesan Cheese

Melt half a stick of butter in a skillet.

Once melted, turn down the heat slightly,
then add your garlic and thyme.

While the butter is browning, throw in your pasta to cook.
Cook according to package directions.

Keep an eye on your butter, stirring it every so often.

When it starts to brown and you smell a nutty flavor, you know it's done.

Add your cooked, drained pasta to the skillet 
and toss to coat it in the browned butter sauce. 

Plate your pasta, add fresh minced parsley and Parmesan cheese.

Dig in and ENJOY!!!

Sunday, July 31, 2016

Greek Chicken Burgers

A few months ago I saw this recipe on a blog I read.
I don't use ground chicken often, but it sounded so good!

I purchased everything I needed just a few days later,
and made these burgers two nights in a row!!!

I changed just a few things from the original recipe,
but they were just as delicious as I thought they'd be.

The Goods:
Hamburger Buns
Ground Chicken
Bread Crumbs
Egg
Cucumber
Red Onion
Lemon
Red Wine Vinegar
Plain Greek Yogurt
Feta (Not Pictured)
Fresh Dill
Parsley Flakes
Salt
Pepper

In a small bowl, combine the following:
1 cup Greek yogurt, juice and zest from 1/2 lemon,
2 teaspoons dried parsley, 1 to 3 teaspoons fresh chopped dill,
salt and pepper to your liking.


In a container with a lid, combine the following:
3/4 cup red wine vinegar, 1/4 of a red onion - thinly sliced,
1 to 2 teaspoons fresh dill - chopped.

Let sit at least 15 minutes, or up to a few days

In a large bowl, combine the following:
1 pound ground chicken, 1/4 red onion - diced, 
1/2 cup bread crumbs, 1 egg, zest from 1/2 a lemon, 
1 to 2 teaspoons fresh chopped dill, 1 teaspoon dried parsley flakes. 

Once mixed, divide into 6 portions and form into patties.

Spray grill and then cook fully.
Toast your buns on the grill too!

Add a little feta cheese and melt for a minute or so.

Spread yogurt mixture onto both buns, 
add thinly sliced cucumbers, 
chicken burger and the pickled onions.

It sadly doesn't look like anything too special...

But man oh man does it sure taste amazing!!!

Greek Chicken Burgers
With Yogurt Dill Sauceand Quick Pickled Onions
Adapted from An Uncomplicated Life

Hamburger Buns
1 Pound Ground Chicken
1/2 cup Bread Crumbs
1 Egg
1 Cucumber
1 Red Onion
1 Lemon
3/4 cup Red Wine Vinegar
1 cup Plain Greek Yogurt
Feta Cheese
Fresh Dill
Parsley Flakes
Salt
Pepper


  1. In a small bowl, combine 1 cup Greek yogurt, juice and zest from 1/2 lemon, 2 teaspoons dried parsley, 1 to 3 teaspoons fresh chopped dill, and salt and pepper to your liking.
  2. In a container with a lid, combine 3/4 cup red wine vinegar, 1/4 of a red onion - thinly sliced and 1 to 2 teaspoons fresh dill - chopped. Let sit at least 15 minutes, or up to a few days
  3. In a large bowl, combine 1 pound ground chicken, 1/4 red onion - diced, 1/2 cup bread crumbs, 1 egg, zest from 1/2 a lemon, 1 to 2 teaspoons fresh chopped dill and 1 teaspoon dried parsley flakes. Once mixed, divide into 6 portions and form into patties.
  4. Spray grill and then cook fully. Toast your buns on the grill too!
  5. Add a little feta cheese to top of burgers and melt for a minute or so.
  6. Spread yogurt mixture onto both buns, add thinly sliced cucumbers, chicken burger and the pickled onions.

Tuesday, March 22, 2016

Roasted Cauliflower Quinoa Bites

and then following those up with Quinoa Pizza Bites,
I decided that I really liked the ease of eating these,
so I set out to make a brand new version of my own!

I'm a big fan of the flavor of roasted cauliflower,
so I knew right away I'd be using that.
And after tossing a few ideas around with a co-worker,
I knew I wanted to include lemon and parmesan as well.

Let me show you how easy it is to make these tasty
Roasted Cauliflower Quinoa Bites!!!

The Goods:
Quinoa
Roasted Cauliflower
Yellow Onion
Garlic
Eggs
Lemons
Parmesan Cheese
Salt
Pepper
Parsley Flakes

Cook quinoa according to your package directions.

In a large bowl, combine your cooked quinoa, roasted cauliflower, 
diced onion, minced garlic, both eggs, most of your parmesan cheese, salt, 
pepper and parsley to your liking, lemon juice and zest and mix to combine.

Stuff filling into greased mini muffin pans
and top with remaining parmesan cheese.

Bake at 350 degrees for 20 to 30 minutes,
until tops are nice and crisp.

Cool in muffin pans for about 5 minutes,
then remove and finish cooling on wire rack.

Roasted Cauliflower Quinoa Bites

3/4 Cup Uncooked Quinoa
1 1/2 Cups Water
2 Cup Roasted Cauliflower
1/2 Cup Diced Yellow Onion
2 Cloves Minced Garlic
2 Eggs
Salt, Pepper and Parsley To Taste
1 Cup Shredded Parmesan Cheese
Juice and Zest from 1/2 a Lemon
  1. Cook your quinoa according to package directions.
  2. Roast your cauliflower (I did mine with juice and zest from 1 lemon, salt, pepper and olive oil.)
  3. In large bowl combine everything (reserve 1/4 of the cheese for topping) and mix well.
  4. Stuff filling into greased mini muffin pans and top with remaining cheese.
  5. Bake at 350 degrees for 20 to 30 minutes until tops are nice and crisp.
  6. Cool in muffin pans for about 5 minutes, then remove and finish cooling on wire rack.


Sunday, October 25, 2015

Tortellini Aglio e Olio

I've had Aglio e Olio with pasta many times,
but I never thought to use it on tortellini until recently.

And let me tell you - it is absolutely amazing!
The sauce gets in all the little pasta crevices and is just WOW!!!
(But really - how can pasta, olive oil, garlic and parm ever taste bad?!?)

I had never made the sauce myself before this time,
but as usual, Google pointed me to something yummy!

This will be my go-to Aglio e Olio recipe
and I just had to share it on the blog.

The Goods:
Tortellini
Olive Oil
Garlic
Red Pepper Flakes
Salt
Italian Parsley
Parmesan Cheese

Heat olive oil in a pan over medium heat.
Add garlic and cook until lightly browned.
Next add the red pepper flakes and cook a minute more.

Cook your pasta according to directions and then drain.

Pour sauce over pasta and toss until mixed well.
Add fresh parsley and parmesan cheese.

Then serve yourself a bowl and dig in!!!

You can easily substitute any pasta of your liking in this recipe.

Tortellini Aglio e Olio 
Adapted from Emeril Lagasse

1 Pound Pasta
1/2 Cup Olive Oil
2 Tablespoons Minced Garlic
1 Tablespoon Red Pepper Flakes
Fresh Grated Parmesan Cheese
Fresh Italian Parsley

  1. Cook your pasta, drain and set aside.
  2. Heat olive oil in a pan over medium heat.
  3. Add garlic and cook until lightly browned.
  4. Add the red pepper flakes and cook a minute more.
  5. Pour sauce over drained pasta and mix well.
  6. Add fresh parsley and parmesan cheese.
  7. Serve, garnish with more parsley and cheese and ENJOY!!!

Friday, July 31, 2015

July Garden Update - 5 Favorites!

Happy last day of July you guys!!!
This month's garden update is extra special,
because it's a Five Friday Favorites post too!

Yup, a two for one on this fine Friday.

And like my usual Five Friday Favorite posts,
I'm linking up with THREE different groups.
Make sure to check them all out at the bottom of this post!

If you're new to the blog,
my garden is kinda what got this thing going,
but my cooking has sorta taken over for the most part.

A few months ago I made a point to post about my garden more.
And I even started a monthly garden update the last day of every month!
If you missed them, check out: March, April, May and June.

Ok - now onto the Five Friday Favorites Update!

Jalapeno Plant
When I posted last month's update,
I said I hadn't seen any buds or blooms recently.
Well wouldn't you know - I have a few of each now!!!

Lemon Tree
Last month I pruned the heck outta my Lemon Tree!
It it still looking pretty bare, but seems to be doing quite well.
I want more leaves already, but I know that will take some time.

Herb Garden

I recently added two new plants to the herb garden.
I hadn't had parsley for quite some time,
and I replaced the dying thyme plant I did have.

Coconut Liners
(Photo Source)
I haven't had liners in my window boxes for months!!!
In fact, I STILL don't, but I have new liners and that's the first step.
I'm hoping to have new flowers planted very soon!

Christmas Tree
Now that we're less than FIVE months from Christmas,
it's time for me to start thinking about the holidays
(I'm only partly joking folks...)
And I can't wait to decorate this monster again in a few months.

Now for more Friday Link Up Fun, check out the blogs below!

Andrea and Erika's blogs from Friday Favorites.

April's blog from 5 on Friday.

Karli and Amy's blogs from oh hey friday!

And lastly, as a quick reminder -
I will be blogging about garden updates 
every last day of each month.

It may not be a complete update each month,
but it will be about something in the garden.

So keep coming back to see what I have growing!

Sunday, April 12, 2015

DIY: Herb Garden Chalkboard Pots

I said I'd blog about my DIY Chalkboard Pots soon.
Well folks, soon is now here!

This project was pretty simple to complete,
and honestly didn't cost much because I owned all the pots.
Check out how I spent little time transforming my herb garden!

The Goods:
Ceramic Pots
Painters Tape
Chalkboard Spray Paint
Colored Spray Paint
Paper Drop Cloth
Chalk (Not Pictured)

Tape a thick line saperating the top portion of the pot from the bottom.

Using Chalkboard Spray Paint cover the top portion and the pot saucers.

Let it dry then remove the tape.

Once dry, completely cover the chalkboard areas with painters tape.

Then spray paint the rest of the pot whatever color you would like.

I personally love this shade and thought it was great for Spring!

Let dry and then remove tape.

Touch up with paintbrush where necessary.

Replant the herbs you have growing.


And using chalk label each pot.

That's it!
Super easy.
Super cute.

Friday, February 20, 2015

Vodka Blush Sauce with Bucatini

I've had this recipe a looooong time - a few years at least. 
I can't even remember where I originally found it,
but it's been in my recipe binder just waiting to be made.

While doing my weekly meal planning I've passed it many times,
but I recently had a HUGE craving for some kind of pasta,
so I finally whipped out my recipe for Vodka Blush Sauce!

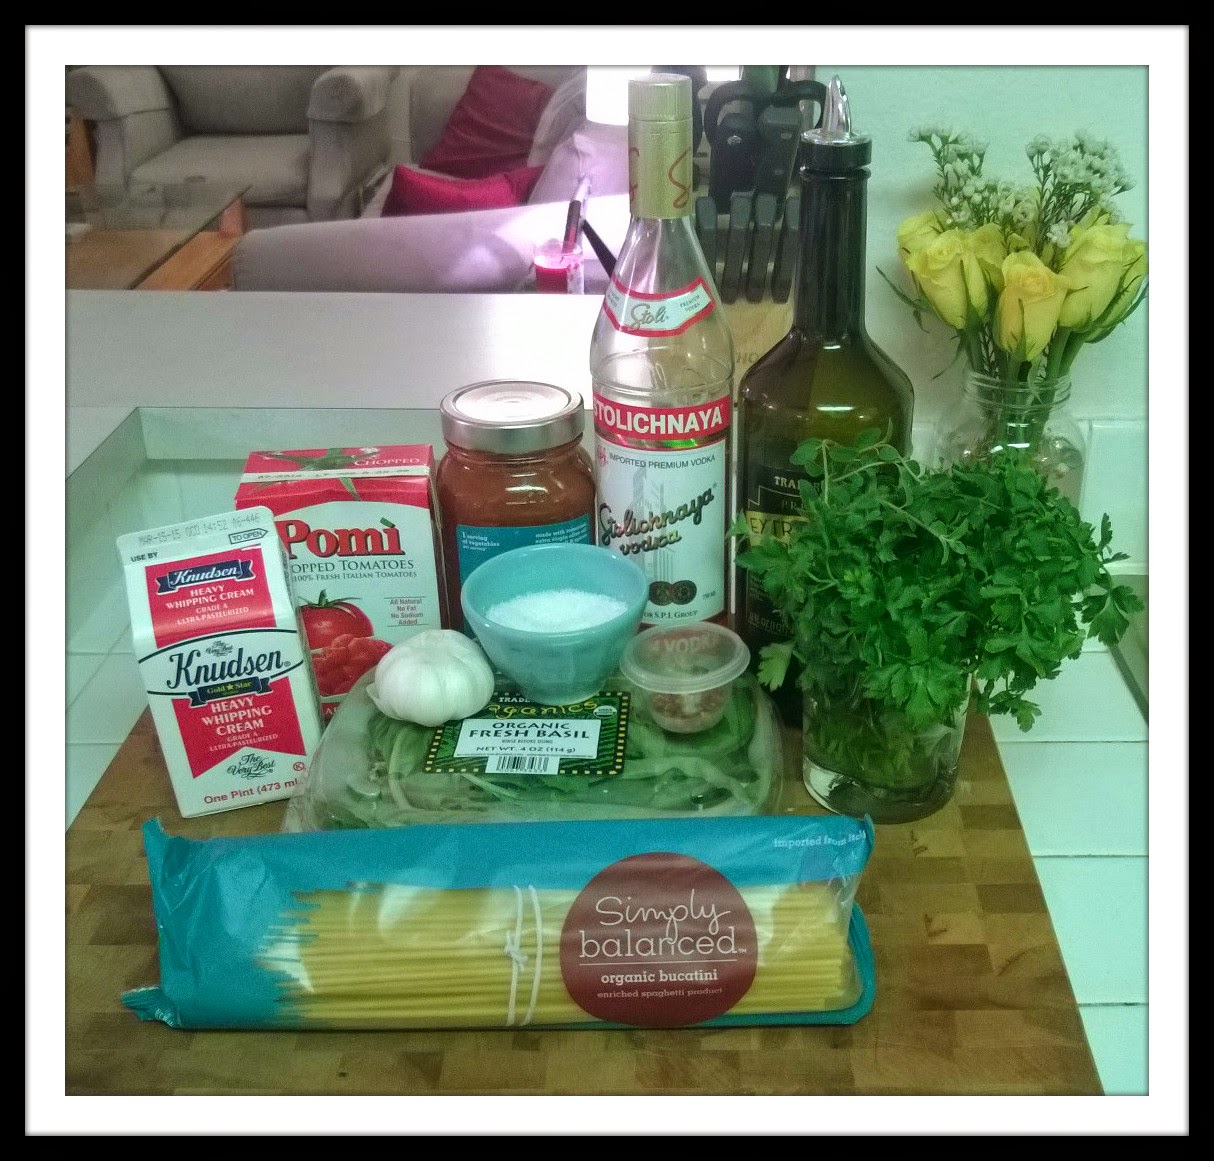
The Goods:
Bucatini Pasta
Olive Oil
Vodka
Marinara Sauce
Chopped/Diced Tomatoes
Heavy Cream
Garlic
Salt
Red Pepper Flakes
Fresh Basil
Fresh Flat Leaf Parsley
Fresh Oregano
 Parmesan Cheese (Not pictured - oops!)
(Full Recipe at bottom of post!)

Heat the olive oil in a large pan, add garlic and red pepper flakes.
Saute for about 30 seconds - until garlic is starting to get fragrant. 
Add marinara sauce, stir, add the chopped tomatoes and stir again.

Next measure out your vodka and add to the sauce.

Add a whole bunch (that's how I measured at least) of fresh herbs!
I used fresh basil, flat leaf parsley and oregano.
Stir to combine and bring to a simmer.
Cook the sauce for about 15 minutes...

Until it looks something like this!

Now add your cream.

Give it another good stir and your sauce is almost done!
Let it simmer 5 more minutes.

At the last minute, I decided the sauce needed something more.
So I added a whole bunch (again - how I measured!) of fresh parmesan.

While the sauce was first simmering, I started my pasta.
I chose to use bucatini, but any pasta would be fine.
Just cook according to the package directions.
OR if you have time - make your own!

Once your pasta is cooked drain it well.

Then add the pasta to your sauce and fully combine together. 
And that's it folks! 

Serve with a little more fresh parmesan and herbs.

This recipe is so easy to make and can even be enjoyed by little ones.
The vodka cooks off, but leaves an amazing taste to the sauce.
I didn't time how long it took me, but I'm betting it was around a half hour.

Vodka Blush Sauce with Bucatini
1 tablespoon olive oil
1 clove garlic, minced
1 heaping teaspoon red pepper flakes
1 large box (26.5 oz) chopped tomatoes
1 jar (24 oz) marinara sauce
2 tablespoons (+/-) fresh flat leaf parsley
1 tablespoon (+/1) fresh basil
1 teaspoon (+/-) fresh oregano
1/4 vodka
1/2 cup heavy cream
fresh parmesan to your liking
salt to taste
1 pound bucatini

Note: the herb measurements should be your guideline,
but as shown above I didn't accurately measure those myself. 

  1. Bring a large pot of salted water to a boil and cook your pasta according to the package directions. (You should start the pasta once your sauce is simmering the first time.)
  2. In a large saute pan, heat the olive oil then add your garlic and red pepper flakes. Cook for about 30 seconds.
  3. Add marinara sauce and chopped tomatoes, then stir to combine.
  4. Add the vodka and stir again.
  5. Add the fresh herbs, stir once again. 
  6. Bring the sauce to a simmer and cook for about 15 minutes.
  7. Add the heavy cream, stir and simmer 5 more minutes.
  8. Add the freshly grated parmesan and stir.
  9. Drain your pasta fully, add to the sauce and combine fully.
  10. Serve with more fresh parmesan and herbs.